

You are using an out of date browser. It may not display this or other websites correctly.
You should upgrade or use an alternative browser.
You should upgrade or use an alternative browser.
-
 image.jpeg1.3 MB · Views: 1,529
 -
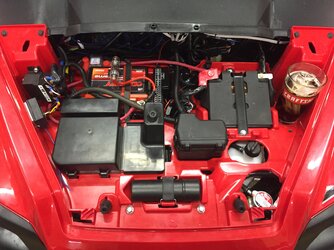 image.jpeg1.6 MB · Views: 1,347
 -
 image.jpeg1.9 MB · Views: 1,148
 -
 2ED5049E-CB42-45F1-B0C3-161E383E3147.JPG1 MB · Views: 787
 -
 46DA0548-B903-44D6-B609-E7B4A777A90C.JPG570.6 KB · Views: 778
 -
 372795BB-E2E1-4F22-BDFC-F825F085B17B.JPG1.2 MB · Views: 769
 -
 DB0C0D16-A9D0-48E7-BB33-520578BACAC0.JPG621.7 KB · Views: 752
 -
 IMG_0013.JPG685.9 KB · Views: 792
 -
 IMG_0064.JPG631.9 KB · Views: 750
 -
 IMG_0300.JPG874.4 KB · Views: 788
 -
 image.png2.2 MB · Views: 797
joeymt33
i4WD=imitated 4WD
Moderator
Lifetime Member
Supporting Member
Club Contributor

Eltobgi
Well-Known Member
Lifetime Member
Supporting Member
Club Contributor
Any idea what caused the seal to fail?Don't know yet but the differential does need to be removed to replace the pinion seal.
lee
Village Idiot
Lifetime Member
Club Contributor
Joey, Not wanting to sound like this is a confession but...(forgive me father...)
If it where my vehicle, I would glue that seal in to make sure it never moved again.
I would not go crazy and glue any other seals, just the rear diff pinion seal.
Something like Permatex Right Stuff.

I use the Right Stuff on my Chevy.
If working on a Chevy I say glue it all together.
FYI, if you have never used this stuff, the valve coves on my GM 6.5L diesel never came off with out getting bent up.
This stuff works too well.
But a little dolly and hammer work and the valve covers glued right back on with out a leak.
Also I would recommend against the bellows even if I was confident the seal was glued in and would never pop out again.
I think it is possible with the temperature changes (diff gets warn from normal running, operator jumps off the creek bank in to 3 feet of water suddenly cooling the diff) to create a pressure across the seals.
Last thing you want is water getting in.
If it where my vehicle, I would glue that seal in to make sure it never moved again.
I would not go crazy and glue any other seals, just the rear diff pinion seal.
Something like Permatex Right Stuff.
I use the Right Stuff on my Chevy.
If working on a Chevy I say glue it all together.
FYI, if you have never used this stuff, the valve coves on my GM 6.5L diesel never came off with out getting bent up.
This stuff works too well.
But a little dolly and hammer work and the valve covers glued right back on with out a leak.
Also I would recommend against the bellows even if I was confident the seal was glued in and would never pop out again.
I think it is possible with the temperature changes (diff gets warn from normal running, operator jumps off the creek bank in to 3 feet of water suddenly cooling the diff) to create a pressure across the seals.
Last thing you want is water getting in.
Delton
Honda Fanboy
Vendor
Lifetime Member
Club Contributor
Well that totally blows. How hard was it?Don't know yet but the differential does need to be removed to replace the pinion seal.
joeymt33
i4WD=imitated 4WD
Moderator
Lifetime Member
Supporting Member
Club Contributor
Any idea what caused the seal to fail?
The bellows that replace the vent tube.
Alan aka Davinci
Mr. Meme Master
Lifetime Member
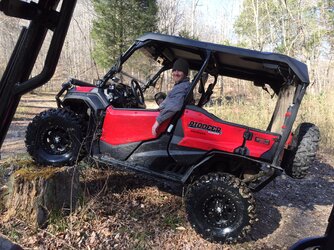
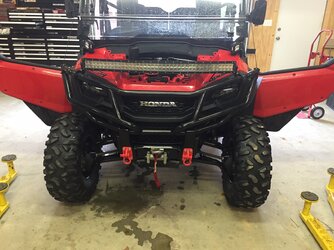
I knew the P1K was powerful but that one is right on your bumper.


joeymt33
i4WD=imitated 4WD
Moderator
Lifetime Member
Supporting Member
Club Contributor
Joey, Not wanting to sound like this is a confession but...(forgive me father...)
If it where my vehicle, I would glue that seal in to make sure it never moved again.
I would not go crazy and glue any other seals, just the rear diff pinion seal.
Something like Permatex Right Stuff.
View attachment 18411
I use the Right Stuff on my Chevy.
If working on a Chevy I say glue it all together.
FYI, if you have never used this stuff, the valve coves on my GM 6.5L diesel never came off with out getting bent up.
This stuff works too well.
But a little dolly and hammer work and the valve covers glued right back on with out a leak.
Also I would recommend against the bellows even if I was confident the seal was glued in and would never pop out again.
I think it is possible with the temperature changes (diff gets warn from normal running, operator jumps off the creek bank in to 3 feet of water suddenly cooling the diff) to create a pressure across the seals.
Last thing you want is water getting in.
Yes, the bellows were not a good idea. I can't believe they worked for 700+ miles.
I pushed the seal back in and it was rather difficult so I'm. It sure of it needs glue or not. I think the manual said to grease it, does that sound right? I'll have to check that again. Anyway, the seal wasn't pushed out very far and I didn't want to completely remove it and risk damaging it. So, it just got tapped back into place and I will try it out today.
Wish me luck
joeymt33
i4WD=imitated 4WD
Moderator
Lifetime Member
Supporting Member
Club Contributor
Is the driveshaft spring loaded?
The rear driveshaft is spring-loaded. The spring is near the Engine side.
advertisement
joeymt33
i4WD=imitated 4WD
Moderator
Lifetime Member
Supporting Member
Club Contributor

joeymt33
i4WD=imitated 4WD
Moderator
Lifetime Member
Supporting Member
Club Contributor
Well that totally blows. How hard was it?
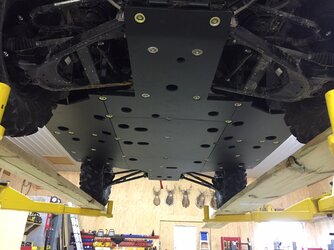
It wasn't too bad. Sure does look funny with all the parts missing....

This thing weighs about 40 pounds!

This was the oil color when I drained it

It got a good washing inside and out

Eltobgi
Well-Known Member
Lifetime Member
Supporting Member
Club Contributor
joeymt33
i4WD=imitated 4WD
Moderator
Lifetime Member
Supporting Member
Club Contributor
I found another problem while making this repair. The front side of the driveshaft where it mates to the transmission, seems to of had a seal problem and was leaking grease.
I don't know if the seal in this picture was in place or out of place before I removed the shaft

It had been slinging grease eight while though

I don't know if the seal in this picture was in place or out of place before I removed the shaft
It had been slinging grease eight while though
Delton
Honda Fanboy
Vendor
Lifetime Member
Club Contributor
Most seals get greased on the inside lip but not the outside. I gotta get me a parts washer. One thing I don't have.
J
Got the radio and three more switches installed today. I had to stop there because I'm waiting on the PDM and USB port for the last switch hole. Also, I'm waiting on the WetSounds Ultra 6 to finish out the stereo.
I cut a hole in the dash and left enough plastic to attach the panel too.
View attachment 17340
Here's the panel cut and ready
View attachment 17341
I went ahead and started wiring what I could like the hots and grounds for the back lighting
View attachment 17342
Here it is installed for now.
View attachment 17343
Sorry if this has already been answered but trying to figure out the proper way to wire switches. I only have one switch installed so far, but the back lights do not stay on when the switch is off. I need to wire it to the headlight wire or the accessory wire in order for the backlights to stay on right? Is that where your red and brown wires that go out of the picture are connected? Then, did you connect anything to the other two prongs on the switches? So in order to run multiple switches from the same power source and have all of the backlights stay on when the switches are off, I would follow this picture?
Sorry if this has already been answered but trying to figure out the proper way to wire switches. I only have one switch installed so far, but the back lights do not stay on when the switch is off. I need to wire it to the headlight wire or the accessory wire in order for the backlights to stay on right? Is that where your red and brown wires that go out of the picture are connected? Then, did you connect anything to the other two prongs on the switches? So in order to run multiple switches from the same power source and have all of the backlights stay on when the switches are off, I would follow this picture?
Post [HASHTAG]#332[/HASHTAG] on Jackal's build thread walks you through wiring your switches. Hope this answers your question.
http://hondasxs.com/threads/jackals-p1000-5.3807/page-17
J
That does help, I think. I have the switch with 5 spades, and nothing connected to 6 and 7. So all I need to do is connect 6 to the brown wire and jump 7 from 8 for the ground in order to have the backlight on even when the switch is off? What about jumping additional switches from this one? I just get everything hooked up right on the first switch and jump each spade to the corresponding spade on the next switch (8 to 8, 2 to 2, 3 to 3, etc)?Post [HASHTAG]#332[/HASHTAG] on Jackal's build thread walks you through wiring your switches. Hope this answers your question.
P1000 - Jackal's P1000-5
joeymt33
i4WD=imitated 4WD
Moderator
Lifetime Member
Supporting Member
Club Contributor
Sorry for the delay guys. I've been at work and haven't had a chance to respond to your question. I should be back in my shop at home later today and take a look at the wiring
Sent from my iPhone using Tapatalk
Sent from my iPhone using Tapatalk
T

advertisement