The Mighty T-Rex Build

Robobrainiac

Robobrainiac

Well-Known Member
Lifetime Member
Jul 15, 2020
2,543
8,932
113
Missouri
Ownership

  1. 1000-5
The Eyes In The Back Of Your Head: 06-25-24

I installed a rear view mirror. It is an Amazon special that I got at a good discount. I paid $35 for it. It fit really well. It is the Xprite 13".


IMG 1900
 
Robobrainiac

Robobrainiac

Well-Known Member
Lifetime Member
Jul 15, 2020
2,543
8,932
113
Missouri
Ownership

  1. 1000-5
My Hair Goes Up: 06-30-24

I installed the SuperATV flip-up windshield. I am not going to go into depth on the installation. SuperATV has decent instructions on their website for that. I thought if I had any trouble with the installation I would document it here. I did not have any issues. After 4 years and 2000 miles on the Pioneer with the SuperATV flip-up, I figured I couldn't go wrong with it on the Teryx.

IMG 1864
 
Robobrainiac

Robobrainiac

Well-Known Member
Lifetime Member
Jul 15, 2020
2,543
8,932
113
Missouri
Ownership

  1. 1000-5
Wench It: 06-30-24

I installed the Badlands Apex 5500 Long Drum using the KFI 100935 plate.

I was able to confirm with KFI that the part number I used was an old part number and should be compatible with my 2024 Teryx4 Camo S. The instructions were vague but it seems fairly self explanatory. I got the plate (old new stock) for $45 so I was excited for it. Half the price of new.


The winch mounted easily onto the plate without any modifications. Just line the bolt holes up and use the included hardware.

With a few turns it fits right into the bumper without removing anything. The only issue I saw was one of the electric posts was very close to the bumper. I had to keep the mount bolts on the plate to the bumper loose to remove the nut and install the wiring.

I wired up the shutoff switch and relay on the passenger side fender area. I used bolts from my personal stash to attach it to the plastic flap. I used the wiring that came with the winch and shortened them as needed to make a clean install.

I cut the lid of an old bucket and used some heat to bend the shape into an apparatus that should semi deflect the ground junk from covering the electrical.

IMG 1865 IMG 1866 IMG 1868 IMG 1869 IMG 1870 IMG 1871 IMG 1872 IMG 1885
 
Last edited:
Robobrainiac

Robobrainiac

Well-Known Member
Lifetime Member
Jul 15, 2020
2,543
8,932
113
Missouri
Ownership

  1. 1000-5
Shift Box: 06-30-24

I installed the Deranged T-Rex shifter knob. It is an easy mod. A philips screwdriver and hard yank removes the old shift knob. You can install the new shifter facing either direction and then use the OE screw to secure the new shift knob. It looks pretty cool.


IMG 1898 IMG 1899
IMG 1874
 
Last edited:
Robobrainiac

Robobrainiac

Well-Known Member
Lifetime Member
Jul 15, 2020
2,543
8,932
113
Missouri
Ownership

  1. 1000-5
Taking A Breather: 06-30-24

I installed the Brute Performance vent kit. I followed the online instructions. They felt a little vague and the filters seem cheap. If I have an opportunity to do it over again I would seek out higher quality filters and run the lines differently for a better more hidden approach. Otherwise the kit works well and installed easily.

Teryx Fuel and vent kit

I would like to vent a little further here than on the other forum. I was very disappointed in what seems like low quality filters. The one way valve machining is not clean. It has a texture on edges that feel like they could cut you if handled incorrectly. The clear filters are very Chinese quality in nature. I would have been happy to pay more for a better quality. It most likely won't really effect anything. It is just personal preference.

I also followed the online instructions which were just pictures and vague line length measurements. I just cut and followed and then ended up with a wierd exposed set of lines. I would not recommend this kit and I would rather have done it myself differently.

They gave me five filters and show five filters on their website but the instructions do not indicate where the fifth filter goes.

IMG 1873
 
Robobrainiac

Robobrainiac

Well-Known Member
Lifetime Member
Jul 15, 2020
2,543
8,932
113
Missouri
Ownership

  1. 1000-5
Need A Lift?: 06-30-24

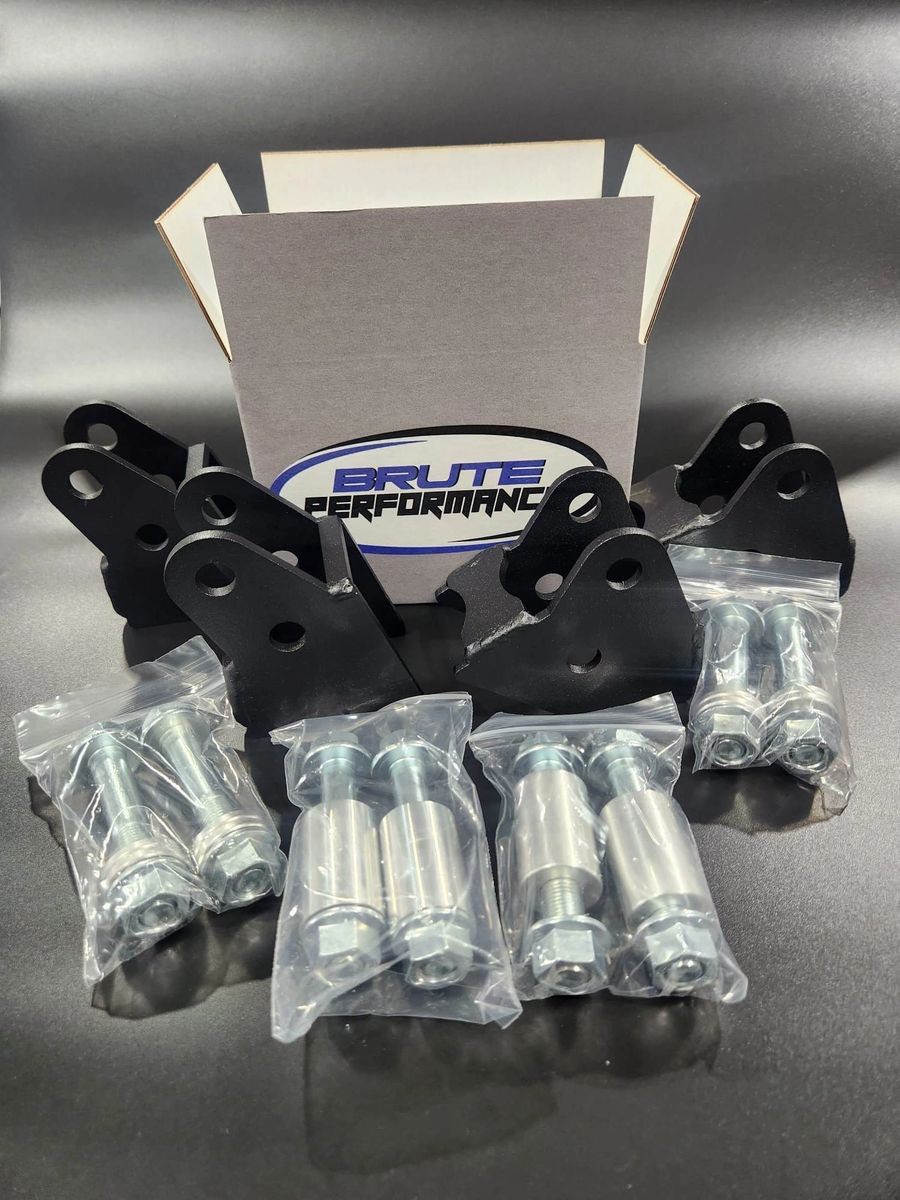
I installed the Brute Performance Teryx4 S lift kit. I followed the online instructions. The install went easy and the fit and finish were very nice. The lift really compliments the machine. It feels like the height it needs to be from factory. I appreciate that it keeps the factory angle of the shocks. I had a bracket lift on another machine for awhile that altered the shock angle and eventually that machine went a totally different route. Maybe in the future new tires and wheels will be added.


IMG 1875


I would like to share some more of my thoughts.

If you know anything about the Teryx there is the "Teryx" and the "Teryx S". Same machine. Just different control arms from the factory. Basically the "S" has arched arms that are slightly wider and slightly forward.

There is only two companies that make a lift for the Teryx S. Brute Performance and SuperATV. SuperATV from my understanding no longer makes the lift kit. So that leaves Brute Performance.

I know people need to make a dollar. It is what allows the world to go around. The S vs Non-S lift is basically the same concept just shaped slightly different in order to fit the different control arms.

The brackets attach at the lower end between the control arm and shock on each corner of the machine.

You can Google search a Teryx lift kit. The bracket parts with all hardware I find on average for $20-$30 shipped to me.

Here is the generic lift kit

IMG 1908 IMG 1909


Here is the Teryx S lift kit.

IMG 1910 IMG 1911

Same concept just slightly different bracket shape. I would not be surprised if the hardware is most likely the exact same.

I understand there is probably a quality difference. There is probably some other forms of differences as well. But the Teryx S kit is $190 after shipping.

I can easily afford $200 versus some other mods that reach into the thousands. Like control arms with lift built in. However, $25 vs $190 is a huge increase.

That is just my two cents I no longer have after spending it elsewhere.....
 
Last edited:
Robobrainiac

Robobrainiac

Well-Known Member
Lifetime Member
Jul 15, 2020
2,543
8,932
113
Missouri
Ownership

  1. 1000-5
This post clearly did not age well.
Lol, I didn't plan on doing much but my wife made the comment "the T-Rex needs to be able to go everywhere the Pioneer goes"


So here we are.


I have done a few more mods I have not had time to post because life is so busy.

We have been preparing for today..... :p
 
  • Like
Reactions: Buggyman and Scoop
advertisement
Robobrainiac

Robobrainiac

Well-Known Member
Lifetime Member
Jul 15, 2020
2,543
8,932
113
Missouri
Ownership

  1. 1000-5
It is time for some re-updating of this thread. Life has been busy and prepping for our vacation kept me from fully showing off some mods.
 
Robobrainiac

Robobrainiac

Well-Known Member
Lifetime Member
Jul 15, 2020
2,543
8,932
113
Missouri
Ownership

  1. 1000-5
Distancing....: 06-30-24

While working on the lift kit I installed SuperATV 2" spacers. The fit and finish on these were super nice. I purchased the type with the lip for the factory wheels. SuperATV did a really good job with these.

IMG 1876
 
Robobrainiac

Robobrainiac

Well-Known Member
Lifetime Member
Jul 15, 2020
2,543
8,932
113
Missouri
Ownership

  1. 1000-5
Brosme Brosme: 06-30-24

I spent a long day working on the Teryx. The last accessory for the day was the tusk spare tire carrier. I used this brand on my pioneer. With a few Drummond trips and a couple Ride Royal Blue trips on that carrier; I felt comfortable going with this brand on the Teryx.


Open the package up and remove all the nice protective wrap.

IMG 1878


Prep the work area and confirm you have all pieces and hardware.


IMG 1879


With my experience using the tusk mount on my Pioneer, I will not be installing this bracket. I like the ease of removal of the hitch without the bracket and my carrier on the Pioneer has been doing well without a similar bracket. I am going to use the Teryx tusk hitch carrier in the same manner I have been using the tusk hitch carrier on my Pioneer.


IMG 1880


Flip the adjustable lugnut plate and set the depth you desire for your spare wheel. Then tighten down those 4 bolts.


IMG 1881


Lastly I mounted my tusk wheel to the tusk spare tire carrier. I was able to get a blem tusk wheel from Rocky Mountain ATV shipped to me for $50 and I bought a Bighorn knockoff called the Roadguider Atlas for $80.


IMG 1882
 
Robobrainiac

Robobrainiac

Well-Known Member
Lifetime Member
Jul 15, 2020
2,543
8,932
113
Missouri
Ownership

  1. 1000-5
Accessorizing: 07-01-24

I added a key on relay that I tapped into the brown/red wire for keyed ignition on the factory fuse box. I am using the relay to power an auxiliary fuse box. At some point I hope to add some cool electrical stuff to the T-Rex.


I wired the relay and fuse box together and used a 100 amp fuse.

IMG 1883


The auxiliary fuse box is screwed into the fan shroud under the hood. The relay is attached using the passenger fan shroud bolt hole. I replaced the factory bolt with a slightly longer bolt.


IMG 1884


I currently only have the winch in use.
 
  • Like
Reactions: Backwoods
Robobrainiac

Robobrainiac

Well-Known Member
Lifetime Member
Jul 15, 2020
2,543
8,932
113
Missouri
Ownership

  1. 1000-5
Let It Slide: 07-01-24

I installed the SuperATV Skid Plate. I followed the online instructions without an issue. I did not tilt/flip my machine. With the Brute Force Lift installed I was able to fit under the machine and get everything taken care of. I was impressed with the factory OE skid plate. I did not realize how well it was engineered until I removed it.

IMG 1889


I would like to discuss the OE skid plate a little. In hindsight there is a small part of me that may not have been as concerned with the skid plate replacement. Here are some photos of the OE skid. Very thick plastic with a section of it being metal. Kawaski did a really good job at protecting this area.

IMG 1886 IMG 1887 IMG 1888


I am going to grab some pictures from SuperATV using their instructions so you can see how well kawasaki did with their skid. This is the factory skid: IMG 2053


This is the SuperATV skid.
IMG 2054


I am very happy with the SuperATV skid and I would definitely recommend it. I just did not realize how well kawasaki made their skid versus the Honda Pioneer.
 
Last edited:
Robobrainiac

Robobrainiac

Well-Known Member
Lifetime Member
Jul 15, 2020
2,543
8,932
113
Missouri
Ownership

  1. 1000-5
Can't Find Your Phone? : 07-01-24

I installed a phone mount next to the rearview mirror. It feels really solid and held up well on our vacation. I use the phone for OnX navigation and it worked out well.


The mount is metal and held the phone perfectly throughout our Drummond Island vacation this year.

IMG 2035 IMG 2036
 
Robobrainiac

Robobrainiac

Well-Known Member
Lifetime Member
Jul 15, 2020
2,543
8,932
113
Missouri
Ownership

  1. 1000-5
Robobrainiac

Robobrainiac

Well-Known Member
Lifetime Member
Jul 15, 2020
2,543
8,932
113
Missouri
Ownership

  1. 1000-5
Breaking It In : 07-01-24

I finally was able to get enough miles on the machine. At 111 miles and 26.7 hours I completed the break in service. I felt like I could open the machine up and start putting it thru it's paces. It started to rain and it was the last thing I was able to get done that day. The rain kept me from taking any photos because I was trying to work quickly and stay dryish. The service felt straightforward with fluid drains and fluid fills easy enough to get to. The OE kit comes with everything you need. Crush washers for the plugs, oil filter, proper fluid types, a pair of gloves, and a disposable paper type funnel. I followed this tutorial and it worked out great.


Again; I would really like to express how impressed I was with the Kawasaki Full Service Kit. It is a box you buy that is ready to go with everything needed to complete the service. If I remember correctly, it cost me $80 at the dealership. That is front differential fluid, rear differential fluid, engine oil, engine oil filter, and includes all crush washers for the drain plugs.
 

Similar threads