P1000 I finally found and purchased a used P1K5 - next steps? Pics!

JoeyL

JoeyL

Well-Known Member
Lifetime Member
Jan 28, 2020
276
741
93
Houston
Ownership

  1. 1000-5
You can do it. hardest part will be getting the ball joints out of the hub, but its not too bad
you may need a socket for the axle nut. i think its 30mm (he says it in the video).
credit to @Russ989 for the video
he is installing SATV arms but it doesnt matter, process is the same
 
Rayger143

Rayger143

Well-Known Member
Lifetime Member
Supporting Member
Aug 5, 2020
3,096
27,188
113
Winfield, BC Canada
Ownership

  1. 1000-5
Ok - am meeting someone tomorrow locally that gave me a great deal on lightly used control arms (with ball joints). Now to figure out what I'm in for to replace these... I'm somewhat mechanically inclined in that I can comfortably change the oil, change out brake pads, even changed out an airbag strut on my SUV... but this'll be my first time doing control arms. Any videos, tips or tricks for the job?
If you do brakes I think you are qualified. I recommend you become a supporting member and then you can download the service manual which very handy to do anything on your machine.
 
P1K5Dave

P1K5Dave

Well-Known Member
Lifetime Member
Club Contributor
Jul 11, 2020
2,245
8,426
113
Petoskey, MI
Ownership

  1. 1000-5
Get a service manual, you're going to want it for a lot of things. Page 20-16 takes you through arm removal, it's pretty straight forward. The toughest part may be getting the ball joint studs out of the hub. You can try putting pulling pressure on them and tapping the hub (near the stud) with a hammer. If that doesn't work, you'll probably need a ball joint extracting tool. There are several kinds that will work (not just the "special tool" listed in the service manual.)

If your local auto parts store has a loaner tool program, you can get a ball joint remove/install kit from them.
 
jtb33

jtb33

Active Member
Apr 4, 2021
41
158
33
AZ
Ownership

  1. 1000-5
Thanks! I will have a look at the video and the service manual. I'm sure I'll become a supporting member soon...

I do have a copy of the service manual... it's a 742 page manual.
 
Last edited:
05Willys

05Willys

Well-Known Member
Apr 21, 2021
529
3,323
93
PA
Ownership

  1. 1000-5
Ok - am meeting someone tomorrow locally that gave me a great deal on lightly used control arms (with ball joints). Now to figure out what I'm in for to replace these... I'm somewhat mechanically inclined in that I can comfortably change the oil, change out brake pads, even changed out an airbag strut on my SUV... but this'll be my first time doing control arms. Any videos, tips or tricks for the job?
Pretty much just simple mechanics. Nothing difficult at all. I have seen videos on YouTube that super atv has for putting their a arms on. Same concept.
check it out.
 
jtb33

jtb33

Active Member
Apr 4, 2021
41
158
33
AZ
Ownership

  1. 1000-5
So one more question... I'm getting both SATV "A" Arms as well as stock "A" Arms to address the bent ones up front. I'm assuming that I can only use the metal "A" Arm guards pictured, on the stock ones, not the SATV ones. Which ones should I install: the "naked" SATV ones or just replace with the OEM ones so I can still use the rock guards?
 
Robobrainiac

Robobrainiac

Well-Known Member
Lifetime Member
Jul 15, 2020
2,551
8,962
113
Missouri
Ownership

  1. 1000-5
So one more question... I'm getting both SATV "A" Arms as well as stock "A" Arms to address the bent ones up front. I'm assuming that I can only use the metal "A" Arm guards pictured, on the stock ones, not the SATV ones. Which ones should I install: the "naked" SATV ones or just replace with the OEM ones so I can still use the rock guards?
Go with the SuperATV arms with no protector. You are correct the guards only work with the stock arms.

The SuperATV arms will be arched and give you some really nice clearance. Most guys on here don't miss the guards.
 
Ohio4x4

Ohio4x4

I brought the dishwasher
Lifetime Member
Aug 23, 2018
1,528
15,413
113
Ohio
Ownership

  1. 1000-3
So one more question... I'm getting both SATV "A" Arms as well as stock "A" Arms to address the bent ones up front. I'm assuming that I can only use the metal "A" Arm guards pictured, on the stock ones, not the SATV ones. Which ones should I install: the "naked" SATV ones or just replace with the OEM ones so I can still use the rock guards?
I tore boots with stock arms that had guards on them. Since the switch to the bare satv arms i haven't had any trouble. I did also switch to the rhino 2.0 axles at the same time. With the satv arms and the 2.0 axles my pk1 turns sharper than the stock 5 seat in our group.
 
P1K5Dave

P1K5Dave

Well-Known Member
Lifetime Member
Club Contributor
Jul 11, 2020
2,245
8,426
113
Petoskey, MI
Ownership

  1. 1000-5
I'm getting both SATV "A" Arms as well as stock "A" Arms to address the bent ones up front.
Buying both? Is it the same seller has both of them used, so he's throwing in the stock ones? But yeah, I'd go with the SATV all day. Get that front tire off the wheel well.
 
JoeyL

JoeyL

Well-Known Member
Lifetime Member
Jan 28, 2020
276
741
93
Houston
Ownership

  1. 1000-5
So one more question... I'm getting both SATV "A" Arms as well as stock "A" Arms to address the bent ones up front. I'm assuming that I can only use the metal "A" Arm guards pictured, on the stock ones, not the SATV ones. Which ones should I install: the "naked" SATV ones or just replace with the OEM ones so I can still use the rock guards?

the SATV arms are better no doubt, even without the guards. this will also eliminate any clearance issues in the front

check w @SuperATV for compatibility of their front arms with the high lifter 2.5" lift kit

from their web page in the fitment tab:
NOTE:
Home Page - SuperATV

im sure there is someone here that has tried it. but i havent. i just remembered reading this when i bought the A Arms
so im not saying they will bind, but SATV is... they are pretty conservative though.
 
advertisement
jtb33

jtb33

Active Member
Apr 4, 2021
41
158
33
AZ
Ownership

  1. 1000-5
Thank you for the replies. Yes, I did get both the SATV arms as well as the stock arms. Seller also mentioned that to use the SATV arms with the lift, I'd need the Rhino axles.

So my options are:

1 - Replace the upper A-Arms with the stock ones and enjoy.
2 - Replace the upper and lower A-Arms (since the ones I got have only a couple hundred miles on them) with the stock ones and enjoy.
3 - Remove the Hi-lifter kit and use the SATV arms, but buy new 28" tires (I've only got the 30's that are on there now).
4 - Leave the Hi-Lifter kit and use the SATV arms, but buy Rhino axles (~$450-500).

I'm leaning towards option 1, but could be talked into option 2 if it's worth it.
 
P1K5Dave

P1K5Dave

Well-Known Member
Lifetime Member
Club Contributor
Jul 11, 2020
2,245
8,426
113
Petoskey, MI
Ownership

  1. 1000-5
My Pioneer with TTC arms has a full 3" of lift, and they're a full 3.5" forward. Stock axles, no binding.

The satv arms and the brackets would have less height and less forward than my setup. I'm not sure why they insist that stock axles are going to be a problem.

Anyway, if you stay stock, replace both. I'd be wary of the lowers if the uppers are bent. Maybe they're ok, but it's not much more work while you're in there.

Do they have ball joints installed, or do you need to do them?
 
jtb33

jtb33

Active Member
Apr 4, 2021
41
158
33
AZ
Ownership

  1. 1000-5
My Pioneer with TTC arms has a full 3" of lift, and they're a full 3.5" forward. Stock axles, no binding.

The satv arms and the brackets would have less height and less forward than my setup. I'm not sure why they insist that stock axles are going to be a problem.

Anyway, if you stay stock, replace both. I'd be wary of the lowers if the uppers are bent. Maybe they're ok, but it's not much more work while you're in there.

Do they have ball joints installed, or do you need to do them?

They have the ball joints installed already; though I do have the fork took to remove them.
 
05Willys

05Willys

Well-Known Member
Apr 21, 2021
529
3,323
93
PA
Ownership

  1. 1000-5
They have the ball joints installed already; though I do have the fork took to remove them.
Just check the boots on your new a arms. The forks tend to put holes in them. If so, try to remove your existing ball joints without the fork so you can use them on the new ones.
 
jtb33

jtb33

Active Member
Apr 4, 2021
41
158
33
AZ
Ownership

  1. 1000-5
I did option 2 today and it hasn't gone very smoothly.

Wasn't any problem to take everything apart other than the tie rod on one side; I need to refill with some grease as the tool pushed a lot of it out of the boot.

Getting things back together was an issue - it's still not together. The replacement OEM arms had ball joints installed in them (and only like 400 miles on them) and they looked relatively clean. However, as I was trying to put the right side upper arm on - the new one - I could not get the castle nut on. Upon closer inspection, the threads on the ball joint were badly out of alignment - I think the previous owner may have pounded on it with a hammer to remove it, or it fell with a lot of force on something. I tried to grind down the first couple threads on it but it just wasn't going to work as the deformation was the first 4-5 threads. I contemplated cutting that portion off, but then the hole for the cotter pin would have been cut. So, I was forced to try to extract the ball joint from the control arm without the proper tool - I have the tools to pop ball joints out of the hub, but not out of a control arm. I tried to jury-rig one using a c-clamp. That didn't work (oh, and yes, I did remove the snap ring first). My local auto parts store didn't have the right tool to borrow, nor buy, so I have to order one from Amazon.

I also need to buy some larger snap ring pliers - the snap-rings on the bottom arms are bigger than the top ones and my snap ring pliers don't quite open far enough to work on those. Hopefully I can pop the ball joint out of the control arm easily with the tool on Monday so I can get this thing put back together.

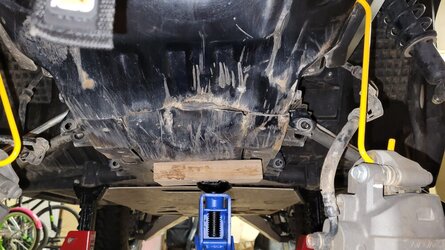
As I have it jacked up, I noticed all kinds of dings and dents in the bottom tube rock sliders and a big dent in the front skid plate on the bottom. It has a metal skid plate on the bottom that replaced the OEM plastic one and most of the dings are on the sides where the plate doesn't cover on the tubes, which I don't think is part of the actual frame. I assume these are just to be expected and not a concern unless it bends the frame, cracks it or puts a hole in it...

Here's a pic of the front skid plate/bumper hit on the bottom front. I assume this is really just cosmetic as well?

20210731 214634
 
Last edited:
Robobrainiac

Robobrainiac

Well-Known Member
Lifetime Member
Jul 15, 2020
2,551
8,962
113
Missouri
Ownership

  1. 1000-5
The dents and dings aren't anything to worry about unless it's the actual frame. Alot of folks are really liking the UHMW skids versus metal.

My own OEM control arm ball joints got buggered up just by removing the castle nut from them. I think I had maybe 2 to 300 miles on mine. If I remember correctly 1 of my ball joint threads was totally useless just by removing the castle nut, it took the threads off with it. The OEM ball joint metal compound is pretty weak.
I did option 2 today and it hasn't gone very smoothly.

Wasn't any problem to take everything apart other than the tie rod on one side; I need to refill with some grease as the tool pushed a lot of it out of the boot.

Getting things back together was an issue - it's still not together. The replacement OEM arms had ball joints installed in them (and only like 400 miles on them) and they looked relatively clean. However, as I was trying to put the right side upper arm on - the new one - I could not get the castle nut on. Upon closer inspection, the threads on the ball joint were badly out of alignment - I think the previous owner may have pounded on it with a hammer to remove it, or it fell with a lot of force on something. I tried to grind down the first couple threads on it but it just wasn't going to work as the deformation was the first 4-5 threads. I contemplated cutting that portion off, but then the hole for the cotter pin would have been cut. So, I was forced to try to extract the ball joint from the control arm without the proper tool - I have the tools to pop ball joints out of the hub, but not out of a control arm. I tried to jury-rig one using a c-clamp. That didn't work (oh, and yes, I did remove the snap ring first). My local auto parts store didn't have the right tool to borrow, nor buy, so I have to order one from Amazon.

I also need to buy some larger snap ring pliers - the snap-rings on the bottom arms are bigger than the top ones and my snap ring pliers don't quite open far enough to work on those. Hopefully I can pop the ball joint out of the control arm easily with the tool on Monday so I can get this thing put back together.

As I have it jacked up, I noticed all kinds of dings and dents in the bottom tube rock sliders and a big dent in the front skid plate on the bottom. It has a metal skid plate on the bottom that replaced the OEM plastic one and most of the dings are on the sides where the plate doesn't cover on the tubes, which I don't think is part of the actual frame. I assume these are just to be expected and not a concern unless it bends the frame, cracks it or puts a hole in it...

Here's a pic of the front skid plate/bumper hit on the bottom front. I assume this is really just cosmetic as well?

View attachment 286712
 
Last edited:
05Willys

05Willys

Well-Known Member
Apr 21, 2021
529
3,323
93
PA
Ownership

  1. 1000-5
I did option 2 today and it hasn't gone very smoothly.

Wasn't any problem to take everything apart other than the tie rod on one side; I need to refill with some grease as the tool pushed a lot of it out of the boot.

Getting things back together was an issue - it's still not together. The replacement OEM arms had ball joints installed in them (and only like 400 miles on them) and they looked relatively clean. However, as I was trying to put the right side upper arm on - the new one - I could not get the castle nut on. Upon closer inspection, the threads on the ball joint were badly out of alignment - I think the previous owner may have pounded on it with a hammer to remove it, or it fell with a lot of force on something. I tried to grind down the first couple threads on it but it just wasn't going to work as the deformation was the first 4-5 threads. I contemplated cutting that portion off, but then the hole for the cotter pin would have been cut. So, I was forced to try to extract the ball joint from the control arm without the proper tool - I have the tools to pop ball joints out of the hub, but not out of a control arm. I tried to jury-rig one using a c-clamp. That didn't work (oh, and yes, I did remove the snap ring first). My local auto parts store didn't have the right tool to borrow, nor buy, so I have to order one from Amazon.

I also need to buy some larger snap ring pliers - the snap-rings on the bottom arms are bigger than the top ones and my snap ring pliers don't quite open far enough to work on those. Hopefully I can pop the ball joint out of the control arm easily with the tool on Monday so I can get this thing put back together.

As I have it jacked up, I noticed all kinds of dings and dents in the bottom tube rock sliders and a big dent in the front skid plate on the bottom. It has a metal skid plate on the bottom that replaced the OEM plastic one and most of the dings are on the sides where the plate doesn't cover on the tubes, which I don't think is part of the actual frame. I assume these are just to be expected and not a concern unless it bends the frame, cracks it or puts a hole in it...

Here's a pic of the front skid plate/bumper hit on the bottom front. I assume this is really just cosmetic as well?

View attachment 286712
Amazing what you find digging into a used machine. I'm not saying there aren't any good cream puffs out there, but they are few and far between. When buying a used ride you need to figure in possible expensive repair costs. I learned that the hard way years ago. I dont think any of those dents pictured are going to be an issue. Happy trails!
 
tdhanses

tdhanses

Well-Known Member
Lifetime Member
Nov 17, 2020
1,044
3,553
113
Kansas
Ownership

  1. 1000-5
New OEM ball joints and clips are dirt cheap, check if Rocky Mountain ATVMC has them instock.

When I pulled my arms to put in SATV arms in, I found the OEM threads get buggered just looking at them when trying to remove.
 
JoeyL

JoeyL

Well-Known Member
Lifetime Member
Jan 28, 2020
276
741
93
Houston
Ownership

  1. 1000-5
I did option 2 today and it hasn't gone very smoothly.

Wasn't any problem to take everything apart other than the tie rod on one side; I need to refill with some grease as the tool pushed a lot of it out of the boot.

Getting things back together was an issue - it's still not together. The replacement OEM arms had ball joints installed in them (and only like 400 miles on them) and they looked relatively clean. However, as I was trying to put the right side upper arm on - the new one - I could not get the castle nut on. Upon closer inspection, the threads on the ball joint were badly out of alignment - I think the previous owner may have pounded on it with a hammer to remove it, or it fell with a lot of force on something. I tried to grind down the first couple threads on it but it just wasn't going to work as the deformation was the first 4-5 threads. I contemplated cutting that portion off, but then the hole for the cotter pin would have been cut. So, I was forced to try to extract the ball joint from the control arm without the proper tool - I have the tools to pop ball joints out of the hub, but not out of a control arm. I tried to jury-rig one using a c-clamp. That didn't work (oh, and yes, I did remove the snap ring first). My local auto parts store didn't have the right tool to borrow, nor buy, so I have to order one from Amazon.

I also need to buy some larger snap ring pliers - the snap-rings on the bottom arms are bigger than the top ones and my snap ring pliers don't quite open far enough to work on those. Hopefully I can pop the ball joint out of the control arm easily with the tool on Monday so I can get this thing put back together.

As I have it jacked up, I noticed all kinds of dings and dents in the bottom tube rock sliders and a big dent in the front skid plate on the bottom. It has a metal skid plate on the bottom that replaced the OEM plastic one and most of the dings are on the sides where the plate doesn't cover on the tubes, which I don't think is part of the actual frame. I assume these are just to be expected and not a concern unless it bends the frame, cracks it or puts a hole in it...

Here's a pic of the front skid plate/bumper hit on the bottom front. I assume this is really just cosmetic as well?

View attachment 286712
sorry to hear that. i was hoping you would avoid the issues since the arms had the ball joints in them already.
like @tdhanses said, new ones are cheap.

probably better to take it to a local atv shop if you have one to press the new one in.
i tried renting the tool from oreily and autozone and they didnt have the right adapters.

hopefully i can save you that annoyance.
 
advertisement

About us

  • Our community has been around for many years and pride ourselves on offering unbiased, critical discussion among people of all different backgrounds. We are working every day to make sure our community is one of the best.

User Menu

Buy us a beer!

  • Lots of time and money has gone into making sure the community is running the best software, best designs, and all the other bells and whistles. Care to buy us a beer? We'd really appreciate it!

    Beer Fund!

    Club Membership!