Getting ride height back

2021LiveValve250R

2021LiveValve250R

Member
Nov 17, 2020
31
42
18
Ohio
Ownership

  1. Talon R
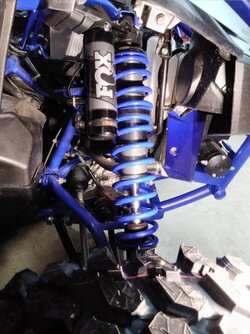
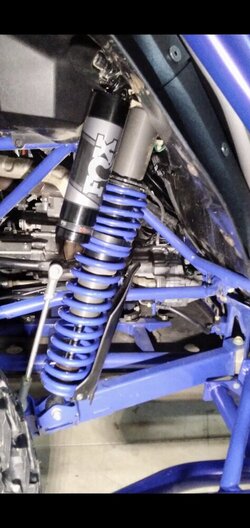
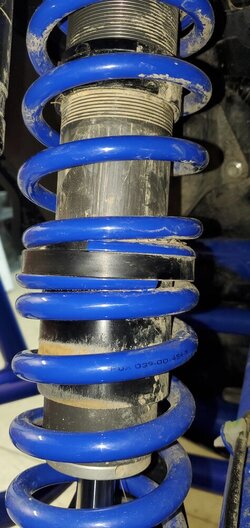
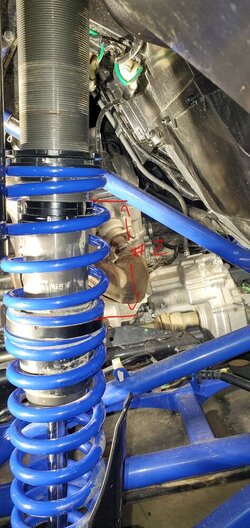
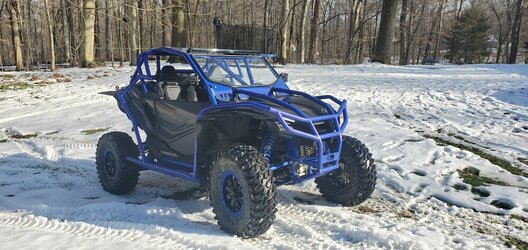
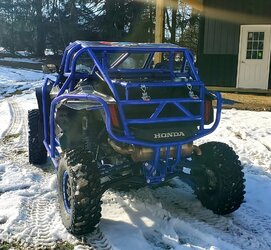
So I've added quite a bit of weight recently with cage install on my 2 seat Live Valve, curious if trying to adjust the stock springs is worth my time or if a full spring kit is just the way to go? Have a trip planned in about 2.5 weeks and want to do something before then, not sure on lead times for spring kits. Currently I'm sitting at about 12.5" of ground clearance front and rear with tires that measure 32". I'll be adding more weight in the rear with gear and spare tire as well.

20210226 160705 20210226 160727 20210228 104204 20210228 104145
 
Last edited:
CID

CID

Well-Known Member
Lifetime Member
Supporting Member
Oct 27, 2019
5,430
24,949
113
SE Denver-ish
Ownership

  1. Talon R
I've also added quite a bit of weight, to the rear mostly and trying to regain stock ground clearance + 1" for my 30" tires. To get anywhere close to that I had to run my preload rings down 20 turns (rear only), this put my crossover rings at the bottom of the shock threads. Unintended consequences - this also put my preload rings too close to the crossover rings and I'm pinching the zip ties I put on the tender springs (letting me know if I was coil binding the tenders). I can't lower the crossover rings any more because they're at the bottom of the shock's threads - it's a temporary conundrum. :eek:

Edit to clarify - I was pinching the zip ties at 25 turns tighter on the preloads with the crossovers bottomed on the shock body (and sitting an inch high). I've since raised the preloads 5 turns (now at 20 turn down) and looking at the gap between the tender coils and the distance between the crossover rings and preload rings - it looks like it will still pinch the zip ties but I've been snowbound and unable to confirm.

I'll be headed for Arizona in about a month, including a trip to Weller Racing (I hope they can fit me in) for shock revalving and probably new tender springs. The link in my sig will take you to more info on tenders and coil bind. It also has a link for a decent spanner wrench for 2-1/2" Fox shocks, a treasure when moving the preload rings 20 turns. Note - jack the Talon up all the way to unload the springs for much easier turning.

A stock Talon R's tenders are just over 4" long at rest, mine are compressed to 3-1/4".
 
Last edited:
M

MDFMac

Active Member
Aug 23, 2020
135
240
43
upstate ny
Ownership

  1. Talon X
i did a set of shock therapy springs. on trails that was doing 20mph on and barely keeping control now i do 40 on for the same feel. lol
and im sure other company's spring kits are fine 2. anything is better than the stock setup imo

btw love the cage....
 
TerryH

TerryH

Well-Known Member
Supporting Member
Sep 13, 2019
664
2,241
93
Springdale, Ar
Ownership

  1. Talon X
I went through this exact same issue with mine. I am "that" guy. Cage, winch, 2nd battery, on and on plus I carry one of everything tool and recovery wise. And added a rack on the hitch with a 52 quart cooler. Went to the Bandit heavy spring package and love it. Gained back the clearance and improved the ride over just the Bandit tender springs. Have 14.0" rear an 14.5" front.

Edit: Woops, didn't think aobut yours being a Live Valve. Not sure what's available for the LV heavier spring wise. I know Bandit doesn't have anything at this time. Guess I'd try cranking in some more preload and see how it goes.
 
Udaman

Udaman

Active Member
Lifetime Member
Aug 20, 2020
29
104
28
Holt, Missouri
Ownership

  1. Talon R
I've also added quite a bit of weight, to the rear mostly and trying to regain stock ground clearance + 1" for my 30" tires. To get anywhere close to that I had to run my preload rings down 20 turns (rear only), this put my crossover rings at the bottom of the shock threads. Unintended consequences - this also put my preload rings too close to the crossover rings and I'm pinching the zip ties I put on the tender springs (letting me know if I was coil binding the tenders). I can't lower the crossover rings any more because they're at the bottom of the shock's threads - it's a temporary conundrum. :eek:

I'll be headed for Arizona in about a month, including a trip to Weller Racing (I hope they can fit me in) for shock revalving and probably new tender springs. The link in my sig will take you to more info on tenders and coil bind. It also has a link for a decent spanner wrench for 2-1/2" Fox shocks, a treasure when moving the preload rings 20 turns. Note - jack the Talon up all the way to unload the springs for much easier turning.

A stock Talon R's tenders are just over 4" long at rest, mine are compressed to 3-1/4".
I ordered the 5-20 mph re-valve package from Weller because I do mostly trail riding with some rock climbing sections and Weller knows all about rock climbing. This is the info I gave them: Installed accessories, winch on front, 42 inch light bar, nerf bars, 70 lb bed mounted storage box, dirt road fab bed extender. 32 X 10 X 15 inch Super grip tires on system 3 wheels. Mostly single occupant 200lbs. Jason called me when he received the shocks at about 9 in the morning on Tuesday 2/16 as he was getting ready to rework my shocks. Told him I would be carrying a spare on occasion. I got a ship notification by 4 o'clock that afternoon and had them by Friday. The nice thing about Weller is when you get your shocks back they have shock covers on them and ready to bolt on and go. No adjusting necessary. I finally got around to installing them this last weekend and WOW what a difference. My Talon actually has a plush ride! Yay! Ride height was perfect 15 inches front and 15 1/2 rear as I am still waiting on the bed extender from Dirt road fab. Once I've installed the bed extender I would expect the rear to drop to about 15 inches. The ride is amazing, my shocks actually do something now! Before shipping my shocks to Weller, I removed the stock springs and removed the nitrogen to collapse the shocks to save on shipping, (smaller boxes and less weight). The fronts are 9 lbs and rears are 12 lbs each without the springs. They were more than double that with the springs installed. It shouldn't have surprised me but another thing about the stock shocks, I absolutely could not compress any of them with the springs removed and the nitrogen charge still in. When you get yours done you'll be amazed and LOVE the ride and it will be Money...Well...Spent!
 
PaulF

PaulF

/\/\/\/\/\/\/\/\/\/\/\/\
Lifetime Member
Jul 1, 2019
1,462
4,814
113
Utah
Ownership

  1. Talon R
I ordered the 5-20 mph re-valve package from Weller because I do mostly trail riding with some rock climbing sections and Weller knows all about rock climbing. This is the info I gave them: Installed accessories, winch on front, 42 inch light bar, nerf bars, 70 lb bed mounted storage box, dirt road fab bed extender. 32 X 10 X 15 inch Super grip tires on system 3 wheels. Mostly single occupant 200lbs. Jason called me when he received the shocks at about 9 in the morning on Tuesday 2/16 as he was getting ready to rework my shocks. Told him I would be carrying a spare on occasion. I got a ship notification by 4 o'clock that afternoon and had them by Friday. The nice thing about Weller is when you get your shocks back they have shock covers on them and ready to bolt on and go. No adjusting necessary. I finally got around to installing them this last weekend and WOW what a difference. My Talon actually has a plush ride! Yay! Ride height was perfect 15 inches front and 15 1/2 rear as I am still waiting on the bed extender from Dirt road fab. Once I've installed the bed extender I would expect the rear to drop to about 15 inches. The ride is amazing, my shocks actually do something now! Before shipping my shocks to Weller, I removed the stock springs and removed the nitrogen to collapse the shocks to save on shipping, (smaller boxes and less weight). The fronts are 9 lbs and rears are 12 lbs each without the springs. They were more than double that with the springs installed. It shouldn't have surprised me but another thing about the stock shocks, I absolutely could not compress any of them with the springs removed and the nitrogen charge still in. When you get yours done you'll be amazed and LOVE the ride and it will be Money...Well...Spent!
I had Weller do mine last fall. Same experience here. Sent shocks without springs to save shipping and had them back in a few days. Slow to medium speed and Rock Crawling are AMAZING, completely different machine. High speed and dunes are good but need to be mindful of how soft it now is to avoid bottom outs. Weller was honest and told me it would be this way because there is no way to make it soft for slow speed and resist bottom out at the same time. I elected for comfort over high speed and just crank up the preload and crossovers, hook up the sway bar and put the shocks on 3 at the dunes. It is a very good compromise for me.

Best $$$ spent so far on my machine so far.

Someday I hope to get a second pair of shocks for the dunes.
 
PaulF

PaulF

/\/\/\/\/\/\/\/\/\/\/\/\
Lifetime Member
Jul 1, 2019
1,462
4,814
113
Utah
Ownership

  1. Talon R
Let's get back on topic. With 32" tires, you should be at 15" ground clearance to maintain stock geometry. Since the spring adjustment to ride height is approx 1 to 2, you will need to crank your preload (and to some extent your crossover rings) about 1.25 to 1.5 inches to get you back to stock geometry. This is about 17 to 21 turns. You should have enough threads left to get you back to ride height. Since you can back off the crossovers up to 20 turns for a softer ride, I would adjust the crossovers only 1/2 of what you do the preload as a starting point to soften up the ride. In other words, crank the preload 20 turns and the crossovers 10.

Make sure and roll the machine 25 feet back and forward to settle the suspension between each measurement.

With all that weight, your ride will be a little more tolerable than normal.

FYI, the springs are not the cause of the rough ride. I discovered the rough ride on my R was due to valving, not spring rate. For instance, I scaled the springs that Weller put on my R and to my surprise, the rear main springs are stiffer than stock and the combined rate is also stiffer. I was so surprised that I scaled them 3 times to make sure. This means the roughness problem is caused by stiff valving.
 
2021LiveValve250R

2021LiveValve250R

Member
Nov 17, 2020
31
42
18
Ohio
Ownership

  1. Talon R
Let's get back on topic. With 32" tires, you should be at 15" ground clearance to maintain stock geometry. Since the spring adjustment to ride height is approx 1 to 2, you will need to crank your preload (and to some extent your crossover rings) about 1.25 to 1.5 inches to get you back to stock geometry. This is about 17 to 21 turns. You should have enough threads left to get you back to ride height. Since you can back off the crossovers up to 20 turns for a softer ride, I would adjust the crossovers only 1/2 of what you do the preload as a starting point to soften up the ride. In other words, crank the preload 20 turns and the crossovers 10.

Make sure and roll the machine 25 feet back and forward to settle the suspension between each measurement.

With all that weight, your ride will be a little more tolerable than normal.

FYI, the springs are not the cause of the rough ride. I discovered the rough ride on my R was due to valving, not spring rate. For instance, I scaled the springs that Weller put on my R and to my surprise, the rear main springs are stiffer than stock and the combined rate is also stiffer. I was so surprised that I scaled them 3 times to make sure. This means the roughness problem is caused by stiff valving.
Thanks Paul! Sounds like there may be a short term solution with adjusting what I have now, and that the ride may even be more tolerable then normal due to the additional weight I have added. I'm not sure if whether the LV R vs non LV R preload and crossover factory settings are the same or not so I may run into an issue there when trying to adjust. If you look at my front vs rear springs in the pictures you can see a significant difference on the preload.

***Edited to add

Looking at my preload on the rear I'm not sure I have 20 turns available

Screenshot 20210301 130258 Gallery
 
Last edited:
PaulF

PaulF

/\/\/\/\/\/\/\/\/\/\/\/\
Lifetime Member
Jul 1, 2019
1,462
4,814
113
Utah
Ownership

  1. Talon R
Thanks Paul! Sounds like there may be a short term solution with adjusting what I have now, and that the ride may even be more tolerable then normal due to the additional weight I have added. I'm not sure if whether the LV R vs non LV R preload and crossover factory settings are the same or not so I may run into an issue there when trying to adjust. If you look at my front vs rear springs in the pictures you can see a significant difference on the preload.

***Edited to add

Looking at my preload on the rear I'm not sure I have 20 turns available
The front/rear position difference of the preload nuts is normal, they are all like that. The front will definitely crank down 20+ turns to raise the front the needed 2.5". The rear will be close but I think you should be OK.

20 turns is a about 1.5 inches. You should have about that much left, maybe a little more. You will need to move the crossovers down 10 turns first.

It will be a bear and you will probably need a shock wrench to do it. Here is how I do it but I am not as pre-loaded as you will be with all that weight...
  1. Completely unload the suspension.
  2. Use a blunt drift and loosen the upper preload nut (and upper crossover nut if adjusting the crossover). Be careful to not turn the lower crossover nut while loosening so you don't get out of sync with the other side.
  3. Lower the bottom crossover nut 10 turns and hand tighten the upper jam nut against it so it doesn't move accidently when you are adjusting the main preload.
  4. Grab the lower spring and the lower crossover nut and start cranking. Turn the entire assembly of springs, separator and adjusting nut all at once. You "might" be able to do it by hand but it will get harder as you go. Some dry lube on the lower spring perch helps (don't use WD40 or anything wet or it will just attract dirt). Crank 20 turns.
  5. Repeat on 3 other corners but don't tighten the jam nuts just yet.
  6. Roll and settle suspension and measure. Repeat if necessary taking note how much it raised and make subsequent adjustments accordingly.
  7. Tighten all jam nuts, go for ride., ENJOY.
If you run out of threads on the rear, you will need to stop and set the front based on the back. It is perfectly acceptable (and some riders even prefer) for the front to be up to 1/2" higher than the rear. Supposed to help with handling although I have tried it and don't notice any difference.
 
advertisement
2021LiveValve250R

2021LiveValve250R

Member
Nov 17, 2020
31
42
18
Ohio
Ownership

  1. Talon R
The front/rear position difference of the preload nuts is normal, they are all like that. The front will definitely crank down 20+ turns to raise the front the needed 2.5". The rear will be close but I think you should be OK.

20 turns is a about 1.5 inches. You should have about that much left, maybe a little more. You will need to move the crossovers down 10 turns first.

It will be a bear and you will probably need a shock wrench to do it. Here is how I do it but I am not as pre-loaded as you will be with all that weight...
  1. Completely unload the suspension.
  2. Use a blunt drift and loosen the upper preload nut (and upper crossover nut if adjusting the crossover). Be careful to not turn the lower crossover nut while loosening so you don't get out of sync with the other side.
  3. Lower the bottom crossover nut 10 turns and hand tighten the upper jam nut against it so it doesn't move accidently when you are adjusting the main preload.
  4. Grab the lower spring and the lower crossover nut and start cranking. Turn the entire assembly of springs, separator and adjusting nut all at once. You "might" be able to do it by hand but it will get harder as you go. Some dry lube on the lower spring perch helps (don't use WD40 or anything wet or it will just attract dirt). Crank 20 turns.
  5. Repeat on 3 other corners but don't tighten the jam nuts just yet.
  6. Roll and settle suspension and measure. Repeat if necessary taking note how much it raised and make subsequent adjustments accordingly.
  7. Tighten all jam nuts, go for ride., ENJOY.
If you run out of threads on the rear, you will need to stop and set the front based on the back. It is perfectly acceptable (and some riders even prefer) for the front to be up to 1/2" higher than the rear. Supposed to help with handling although I have tried it and don't notice any difference.
Paul this is great, thanks again! I'll give this a try tonight or tomorrow, starting with the rear.

CID, good call on marking the rings!
 
  • Like
Reactions: CID
2021LiveValve250R

2021LiveValve250R

Member
Nov 17, 2020
31
42
18
Ohio
Ownership

  1. Talon R
The front/rear position difference of the preload nuts is normal, they are all like that. The front will definitely crank down 20+ turns to raise the front the needed 2.5". The rear will be close but I think you should be OK.

20 turns is a about 1.5 inches. You should have about that much left, maybe a little more. You will need to move the crossovers down 10 turns first.

It will be a bear and you will probably need a shock wrench to do it. Here is how I do it but I am not as pre-loaded as you will be with all that weight...
  1. Completely unload the suspension.
  2. Use a blunt drift and loosen the upper preload nut (and upper crossover nut if adjusting the crossover). Be careful to not turn the lower crossover nut while loosening so you don't get out of sync with the other side.
  3. Lower the bottom crossover nut 10 turns and hand tighten the upper jam nut against it so it doesn't move accidently when you are adjusting the main preload.
  4. Grab the lower spring and the lower crossover nut and start cranking. Turn the entire assembly of springs, separator and adjusting nut all at once. You "might" be able to do it by hand but it will get harder as you go. Some dry lube on the lower spring perch helps (don't use WD40 or anything wet or it will just attract dirt). Crank 20 turns.
  5. Repeat on 3 other corners but don't tighten the jam nuts just yet.
  6. Roll and settle suspension and measure. Repeat if necessary taking note how much it raised and make subsequent adjustments accordingly.
  7. Tighten all jam nuts, go for ride., ENJOY.
If you run out of threads on the rear, you will need to stop and set the front based on the back. It is perfectly acceptable (and some riders even prefer) for the front to be up to 1/2" higher than the rear. Supposed to help with handling although I have tried it and don't notice any difference.
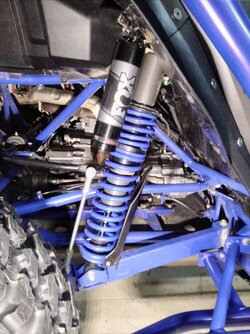
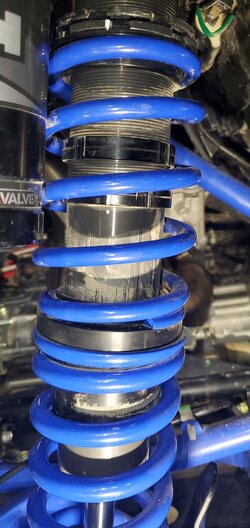
I was only able to get 7 turns out of crossover nut in the rear before running out of threads.

20210301 185903
 
PaulF

PaulF

/\/\/\/\/\/\/\/\/\/\/\/\
Lifetime Member
Jul 1, 2019
1,462
4,814
113
Utah
Ownership

  1. Talon R
I was only able to get 7 turns out of crossover nut in the rear before running out of threads.
That's OK, they are already about 15 to 20 turns too low to begin with so you can turn the preloads at least 20 turns (maybe even 25). Just make sure that when you are done, you have at least 1" from the bottom of the top spring perch to the top of the top crossover nut. If it is any closer it may coil bind and ruin the springs.

Here is the factory technical drawing for the R. You can put a couple zip ties on the coils to check for coil bind. If the zip ties get cut, you are binding.

I am fairly confident the LV has the same spring coil count and wire diameter so this should be OK and not coil bind as long as you maintain 1 ". If you want to make sure before you go for a spin, put a set of calipers on that upper spring we can determine when the coil will bind...

1614644238103
 
  • Like
Reactions: Boundertom
2021LiveValve250R

2021LiveValve250R

Member
Nov 17, 2020
31
42
18
Ohio
Ownership

  1. Talon R
That's OK, they are already about 15 to 20 turns too low to begin with so you can turn the preloads at least 20 turns (maybe even 25). Just make sure that when you are done, you have at least 1" from the bottom of the top spring perch to the top of the top crossover nut. If it is any closer it may coil bind and ruin the springs.

Here is the factory technical drawing for the R. You can put a couple zip ties on the coils to check for coil bind. If the zip ties get cut, you are binding.

I am fairly confident the LV has the same spring coil count and wire diameter so this should be OK and not coil bind as long as you maintain 1 ". If you want to make sure before you go for a spin, put a set of calipers on that upper spring we can determine when the coil will bind...

View attachment 257988
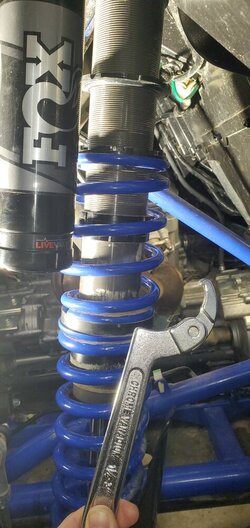
Ok thanks, it's definitely a bear, only got one turn out of rotating the lower and upper springs. Using adjustable spanner now, ive made it 7 turns so far lol.

20210301 192908
 
  • Like
Reactions: CID
PaulF

PaulF

/\/\/\/\/\/\/\/\/\/\/\/\
Lifetime Member
Jul 1, 2019
1,462
4,814
113
Utah
Ownership

  1. Talon R
Ok thanks, it's definitely a bear, only got one turn out of rotating the lower and upper springs. Using adjust spanner now, ive made it 7 turns so far lol.

View attachment 257989
Spring compressors work good but if you don't have one handy you can use a couple small ratchet straps across form each other to take the tension off the spring and turn the nut without turning the springs. Just tighten the straps evenly, turn nut, tighten straps a little more, turn nut, etc. This is safe as long as you don't try to do too much at once.

Also, when you are done, make sure the springs are clocked correctly 180 degrees apart. This means that the top end of the lower spring 180 degrees apart from the bottom end of the top spring. If you don't do this, it causes the springs/separator to rub on the shock body.
 
  • Like
Reactions: 2021LiveValve250R
2021LiveValve250R

2021LiveValve250R

Member
Nov 17, 2020
31
42
18
Ohio
Ownership

  1. Talon R
Spring compressors work good but if you don't have one handy you can use a couple small ratchet straps across form each other to take the tension off the spring and turn the nut without turning the springs. Just tighten the straps evenly, turn nut, tighten straps a little more, turn nut, etc. This is safe as long as you don't try to do too much at once.

Also, when you are done, make sure the springs are clocked correctly 180 degrees apart. This means that the top end of the lower spring 180 degrees apart from the bottom end of the top spring. If you don't do this, it causes the springs/separator to rub on the shock body.
Interesting enough none of my springs were clocked 180° apart, they all were like this..

20210301 195558
 
2021LiveValve250R

2021LiveValve250R

Member
Nov 17, 2020
31
42
18
Ohio
Ownership

  1. Talon R
Got the right rear crossover 7 turns down and the preload 20 turns down with upper and lower springs 180° out. On to the left rear...
If it aint broke, don't fix it :)

Mine weren't clocked very good either and the right rear got scratched to hell before I caught it.
 
  • Like
Reactions: CID
PaulF

PaulF

/\/\/\/\/\/\/\/\/\/\/\/\
Lifetime Member
Jul 1, 2019
1,462
4,814
113
Utah
Ownership

  1. Talon R
Got the right rear crossover 7 turns down and the preload 20 turns down with upper and lower springs 180° out. On to the left rear...
Excellent. Lets check a couple measurements to make sure you will be OK without coil bind...
  1. What is the wire diameter of your springs? This need to be fairly accurate so use some dial calipers if you have them. If not, do a go/no-go with some open end wrenches.
  2. What is the distance from the top of the top crossover nut to the bottom of the top spring perch? (measure this to the plastic shim, the top of the flat part of the spring also works good).
 
2021LiveValve250R

2021LiveValve250R

Member
Nov 17, 2020
31
42
18
Ohio
Ownership

  1. Talon R
Excellent. Lets check a couple measurements to make sure you will be OK without coil bind...
  1. What is the wire diameter of your springs? This need to be fairly accurate so use some dial calipers if you have them. If not, do a go/no-go with some open end wrenches.
  2. What is the distance from the top of the top crossover nut to the bottom of the top spring perch? (measure this to the plastic shim, the top of the flat part of the spring also works good).
. 441" diameter coil on top spring

Assuming number 2 needs to be measured with the suspension settled? Still on the jack in this picture, is that the measurement point you're referencing?

20210301 203242
 
advertisement

About us

  • Our community has been around for many years and pride ourselves on offering unbiased, critical discussion among people of all different backgrounds. We are working every day to make sure our community is one of the best.

User Menu

Buy us a beer!

  • Lots of time and money has gone into making sure the community is running the best software, best designs, and all the other bells and whistles. Care to buy us a beer? We'd really appreciate it!

    Beer Fund!

    Club Membership!