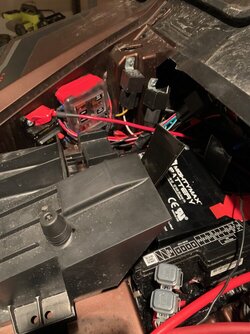
P1000 Under “hood” pics needed

E

elarson6772

Active Member
Supporting Member
Mar 23, 2024
34
109
33
Saginaw, Michigan
Ownership

  1. Looking to buy
I have a new 2023 1000-6 and am about to do the dual battery setup with violator, stinger, fuse panel, etc. when I took the cover off the front of the machine I was like “where the hell do I put all this stuff”?

I have factory heat, windshield wipers, etc so my machine has the OEM fuse box so no room to mount anything over the battery.

I’d love pics of others with the same and where you put everything for this project under there.
 
Remington

Remington

Fife! POIDH Enforcement Officer
Lifetime Member
Supporting Member
Jul 24, 2016
20,161
115,316
113
Michigan
Ownership

  1. 1000-5

  2. Talon X
I have a new 2023 1000-6 and am about to do the dual battery setup with violator, stinger, fuse panel, etc. when I took the cover off the front of the machine I was like “where the hell do I put all this stuff”?

I have factory heat, windshield wipers, etc so my machine has the OEM fuse box so no room to mount anything over the battery.

I’d love pics of others with the same and where you put everything for this project under there.
Any P1 under hood pic will work. There virtually the same. You can find them in folks builds. Id have to dig through mine to find you some. But the main issue your gonna run into is that you have all that OEM accessories in there. Havent seen but a few that have that and the extra stuff. All under hood set ups are NEVER the same, they are always someones own creation. So I would say to just start and see what works for you. Thats what I did.
You would 💩 if you seen it now from where it started. Changed 5 times🤣
You could post a pic of your compartment with all the OEM accessories in it and we can give u some pointers on where to start.
 
JACKAL

JACKAL

Ancient Honda fanboi
Moderator
Lifetime Member
Supporting Member
Club Contributor
Jun 11, 2015
39,809
271,885
113
Pioneer, TN
Ownership

  1. 1000-5

  2. Talon X4
I have a new 2023 1000-6 and am about to do the dual battery setup with violator, stinger, fuse panel, etc. when I took the cover off the front of the machine I was like “where the hell do I put all this stuff”?

I have factory heat, windshield wipers, etc so my machine has the OEM fuse box so no room to mount anything over the battery.

I’d love pics of others with the same and where you put everything for this project under there.
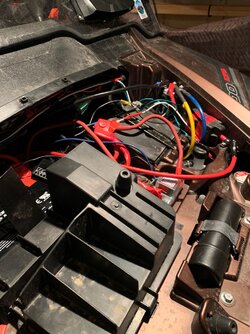
See the beginning of the thread for list of parts and links to them in club store.

Screenshot 20240514 223713 Chrome
 
Remington

Remington

Fife! POIDH Enforcement Officer
Lifetime Member
Supporting Member
Jul 24, 2016
20,161
115,316
113
Michigan
Ownership

  1. 1000-5

  2. Talon X

See the beginning of the thread for list of parts and links to them in club store.
☝🏻☝🏻☝🏻☝🏻THIS is an example of ones build.
@elarson6772
 
  • Like
Reactions: ChadD and TxDoc
JACKAL

JACKAL

Ancient Honda fanboi
Moderator
Lifetime Member
Supporting Member
Club Contributor
Jun 11, 2015
39,809
271,885
113
Pioneer, TN
Ownership

  1. 1000-5

  2. Talon X4
More details after installation with links here:

 
E

elarson6772

Active Member
Supporting Member
Mar 23, 2024
34
109
33
Saginaw, Michigan
Ownership

  1. Looking to buy
More details after installation with links here:

My challenge is finding space under there to mount the isolator, fuse block, stinger, etc. With the factory fuse box in the machine I lose the ability to mount anything over the second battery. Seems like wasted space with the air intake but not sure what option exists to eliminate that cover somehow.
 
JACKAL

JACKAL

Ancient Honda fanboi
Moderator
Lifetime Member
Supporting Member
Club Contributor
Jun 11, 2015
39,809
271,885
113
Pioneer, TN
Ownership

  1. 1000-5

  2. Talon X4
Everyone just using self tapping screws to mount stuff to the OEM plastic?
Don't remove the air pre filter cover, at the back of it is a push pin that holds it in place, I used that as a front mounting point to my plastic plate, further back the fender mount to a frame cross members with another push pin, I used that to secure the back of my plate, to which the stinger, fuse box and winch relay are mounted as shown in the picture in my prior posts here. The plastic plate should be able to rest on top of your second battery if it doesn't stick up too high.
 
  • Like
Reactions: ChadD
E

elarson6772

Active Member
Supporting Member
Mar 23, 2024
34
109
33
Saginaw, Michigan
Ownership

  1. Looking to buy
Don't remove the air pre filter cover, at the back of it is a push pin that holds it in place, I used that as a front mounting point to my plastic plate, further back the fender mount to a frame cross members with another push pin, I used that to secure the back of my plate, to which the stinger, fuse box and winch relay are mounted as shown in the picture in my prior posts here. The plastic plate should be able to rest on top of your second battery if it doesn't stick up too high.
I’ve got the factory fuse block blocking my ability to have anything over the second battery at all.
 
  • Like
Reactions: ChadD
advertisement
P

packer58

Well-Known Member
Jun 17, 2021
312
943
93
N. Cali
Ownership

  1. 1000-3
@elarson6772 My rig is a 2021 but I think basically the same. Here's what I did to use the wasted space behind the second battery box, sheet aluminum, a little bending, a little cutting and a little drilling ...............


Image0 2
Image2 1
 
RacinJasonWV

RacinJasonWV

Active Member
Aug 8, 2022
79
216
33
WV
Ownership

  1. 1000-5
Everyone just using self tapping screws to mount stuff to the OEM plastic?

I used 3M double sided tape for fuse block and some other items. Seems to work well.

My install has the aux-on fuse box on the passenger side and the isolator in the center as shown in the photos. Nothing above the second battery.

IMG 0282
IMG 0284


If you need some extra room to mount the stinger then maybe install inside the inner fender? I found there’s quite a bit of wasted space in there.

I’m still a noob, but this might help give you some ideas.
 
Last edited:
  • Like
Reactions: ChadD and NTCPrezJB
StewB

StewB

Well-Known Member
Jan 2, 2021
720
3,340
93
Utah
Ownership

  1. 1000-5
2021 P1k5 - I've cleaned up the neutral on the main battery, but this is it. The winch contactor and fuse are on the far driver's side, isolator in the middle.

View

A 30A marine breaker, KOP relay, and fuse box on passenger side. I regret picking the 6 post fuse box instead of a 12.

View
 
  • Like
Reactions: ChadD and NTCPrezJB
RacinJasonWV

RacinJasonWV

Active Member
Aug 8, 2022
79
216
33
WV
Ownership

  1. 1000-5
I regret picking the 6 post fuse box instead of a 12.

Yeah me too. We don’t have a lot of accessories but I’ve already doubled up some of the low amp items saving 1 empty spot for now. Not sure how much room the 12 post would take up though. The 6 post fits really well in that spot we both appear to have chosen.
 
  • Like
Reactions: NTCPrezJB
Remington

Remington

Fife! POIDH Enforcement Officer
Lifetime Member
Supporting Member
Jul 24, 2016
20,161
115,316
113
Michigan
Ownership

  1. 1000-5

  2. Talon X
Alright I had to dig for it. This was back in 16’ again not the same as the new rigs.
I used the waterproof Bussman fuse box that @joeymt33 put in first on his 16’ (see black box upper left) many at the time used them as well. Has relays in the box not just fuses.
Im still running this today in there. Its held up through the gates if hell. Ive only had to replace a few relays. Note the true Isolator and it position. NOTE The winch wire was removed from the main battery shortly after that pic.
That compartment has changed 10 times i bet since then
IMG 1471
 
  • Like
Reactions: 540RA and NTCPrezJB
bumperm

bumperm

Well-Known Member
May 7, 2021
1,898
6,777
113
Gardnerville, NV
Ownership

  1. 1000-5
Nice ideas above. Couple of hints with (with no pics @Remington ;)). When making sheet metal brackets, it's good practice to drill a small hole where the inside corner/s will be - this way it greatly reduces the chance of stress risers/cracking due to flexure.

When attaching stuff with double sided tape that you might want to remove occasionally (to make wiring changes etc.), consider using 3M "dual lock" (mushroom lock) instead. It pries apart and then snaps back together, yet is very secure. Be sure to add a bit of length to any wiring harness involved to allow for moving a fuse box (or whatever) out of the way to work on it more conveniently.
 
P

packer58

Well-Known Member
Jun 17, 2021
312
943
93
N. Cali
Ownership

  1. 1000-3
Nice ideas above. Couple of hints with (with no pics @Remington ;)). When making sheet metal brackets, it's good practice to drill a small hole where the inside corner/s will be - this way it greatly reduces the chance of stress risers/cracking due to flexure.

When attaching stuff with double sided tape that you might want to remove occasionally (to make wiring changes etc.), consider using 3M "dual lock" (mushroom lock) instead. It pries apart and then snaps back together, yet is very secure. Be sure to add a bit of length to any wiring harness involved to allow for moving a fuse box (or whatever) out of the way to work on it more conveniently.
Good point on drilling all inside corners to help prevent cracking, you can see in my pics that I didn't do that and should have, if I detect any cracking I will remove the bracket and take a round file and relieve those corners a bit ........
 
seijirou

seijirou

Well-Known Member
Lifetime Member
Apr 17, 2024
92
987
83
Kaufman, TX
Ownership

  1. 1000 6 Crew
@elarson6772 My rig is a 2021 but I think basically the same. Here's what I did to use the wasted space behind the second battery box, sheet aluminum, a little bending, a little cutting and a little drilling ...............


View attachment 429101View attachment 429102

Do you have a template for this? Or sell them? Or sell the email for a guy (or girl) who sells them and/or has the template for this?
 
  • Like
Reactions: ChadD
advertisement

About us

  • Our community has been around for many years and pride ourselves on offering unbiased, critical discussion among people of all different backgrounds. We are working every day to make sure our community is one of the best.

User Menu

Buy us a beer!

  • Lots of time and money has gone into making sure the community is running the best software, best designs, and all the other bells and whistles. Care to buy us a beer? We'd really appreciate it!

    Beer Fund!

    Club Membership!