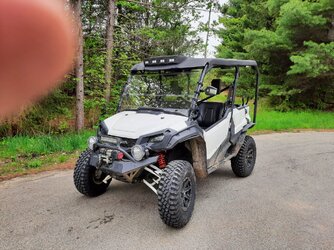
P1000 P1K5Dave's 1000-5 Build

P1K5Dave

P1K5Dave

Well-Known Member
Lifetime Member
Club Contributor
Jul 11, 2020
2,244
8,419
113
Petoskey, MI
Ownership

  1. 1000-5
I may re-wire these so that the overhead lights and the cannon lights are both on a single DPDT switch, so it's either both OFF or one or the other ON.

That would be consistent with how I want to use them like Low/High on steroids, and would protect from other drivers trying to run both at the same time.
 
  • Like
Reactions: Russ989 and Lady01
bumperm

bumperm

Well-Known Member
May 7, 2021
1,898
6,777
113
Gardnerville, NV
Ownership

  1. 1000-5
Dave,

Wouldn't you want an On-OFF-On switch for that application? If you are gonna use relays, that switch could also control two relays. Since you only need to switch positive, no need for double pole.
 
P1K5Dave

P1K5Dave

Well-Known Member
Lifetime Member
Club Contributor
Jul 11, 2020
2,244
8,419
113
Petoskey, MI
Ownership

  1. 1000-5
Dave,

Wouldn't you want an On-OFF-On switch for that application? If you are gonna use relays, that switch could also control two relays. Since you only need to switch positive, no need for double pole.
Possibly? My initial thought was that I'd need to go DPDT if I wanted the rocker switch graphics to light the top or bottom independently.
 
  • Like
Reactions: Lady01
bumperm

bumperm

Well-Known Member
May 7, 2021
1,898
6,777
113
Gardnerville, NV
Ownership

  1. 1000-5
An option is to use two standard illuminated DPDT switches. One side of each switch provides 12 volt power to the LED side of the other. This way one switch has to be off in order for the other switch to provide power to its LED, and only one LED can be illuminated at a time. If both switches are on, neither LED will work, same as if both switches are off. This provides a foolproof interlock, but I think I'd wire them the regular way so both could be on if desired (acknowledging current draw would not be sustainable). (Illumination terminals not shown but wired normally.)


20220423 095625
 
  • Like
Reactions: CID
P1K5Dave

P1K5Dave

Well-Known Member
Lifetime Member
Club Contributor
Jul 11, 2020
2,244
8,419
113
Petoskey, MI
Ownership

  1. 1000-5
Cool, thanks bumper. I'll run this thru the processor when I'm not under the influence, lol
 
Russ989

Russ989

Land of the free because of the Brave! 🇺🇸
Lifetime Member
Supporting Member
Club Contributor
Dec 18, 2017
22,642
147,257
113
Missouri
Ownership

  1. 1000-5
I may re-wire these so that the overhead lights and the cannon lights are both on a single DPDT switch, so it's either both OFF or one or the other ON.

That would be consistent with how I want to use them like Low/High on steroids, and would protect from other drivers trying to run both at the same time.
I hate wiring a SXS, I’m thinking about adding lights though. DOH!
 
  • Haha
Reactions: Tie and JenElio
JMynes

JMynes

Well-Known Member
Lifetime Member
Dec 31, 2021
544
3,238
93
Augusta, Maine
Ownership

  1. 1000-5
If I understand this correctly you have Low beams, High beams, Uber-High beams, and Ridiculously High beams.
Any plans for a trailer mounted searchlight?

EC6584A3 0888 4E7C 9BA1 66D7357DA308


You won’t need a second battery with this one, comes with its own generator.
 
P1K5Dave

P1K5Dave

Well-Known Member
Lifetime Member
Club Contributor
Jul 11, 2020
2,244
8,419
113
Petoskey, MI
Ownership

  1. 1000-5
Yesterday I got the Honda rear bumper mounted up, and while I was in there I went ahead and did the RB3 door bushings all around.

20220510 211138


It was a bit of a pain, but there are some things I learned that I'll write up later that would have helped to know going in.
 
P1K5Dave

P1K5Dave

Well-Known Member
Lifetime Member
Club Contributor
Jul 11, 2020
2,244
8,419
113
Petoskey, MI
Ownership

  1. 1000-5
I was a little skeptical regarding the RB3 door bushings. I've been able to keep my doors relatively quiet by making sure the rubber stoppers are spaced correctly. But when I took apart the rear doors, I was shocked to see how bad the factory bushings looked in there. Once I got it all back together and snugged up my doors, they're quieter than ever.
 
P1K5Dave

P1K5Dave

Well-Known Member
Lifetime Member
Club Contributor
Jul 11, 2020
2,244
8,419
113
Petoskey, MI
Ownership

  1. 1000-5
My LR outer axle boot popped off last week while we were out riding. I didn't know about it until the 4 mile pavement ride home from the trails, when it had shed all of its grease and started smelling hot.

Figured it was an opportunity to go ahead and replace both rear axles with Rhino 2.0s to match the fronts - especially since these rears have 10k on them with a 3" lift. This way I can keep them as backups before they get trashed.

While replacing the LR, I discovered that all of my knuckle bushings are shot, so I'm going to get them on order before I replace the RR axle.
20220503 182921
 
advertisement
P1K5Dave

P1K5Dave

Well-Known Member
Lifetime Member
Club Contributor
Jul 11, 2020
2,244
8,419
113
Petoskey, MI
Ownership

  1. 1000-5
Lessons learned installing the Honda Accessories rear bumper:

  • You're going to want to completely remove the rear side panels. I don't see any way to get the tailgate pivot pins out without doing so first.
  • This involves removing your rear doors and hinges, since the hinge bolts are what's left holding those side panels on.
  • I knew this ahead of time, having read other guys experiences here. With that forethought, I decided it would be a good time to do RB3 door bushings while I had those hinges off. Two birds, one stone. Really glad I did this.
  • Your hinge bolts can be wicked to get out. They use some really tough thread locker in there, and you can't really apply heat with all that plastic. The bolt heads are 10mm on an 8mm bolt (most any 8mm bolt you pick up will have a 12mm head) and they're soft. Recipe for disaster.
  • Two of my 8 bolts on the first door got trashed trying to get them out.
  • 20220510 192840

  • From this horrible experience, I learned a few things that can help you avoid this agony:
  • Take your doors off the hinges first, by popping the e-clip and pulling the pin. This way, you'll have better access to the bolts.
  • Use a six-point socket only. Don't go in there with a 12. Don't do it...
  • Some of them will break and turn initially, but then be a total b**** to thread the rest of the way out. You can actually destroy the bolt head trying to get them the rest of the way out.
  • The method I found that worked best here was to thread out some, then back in. Hit it with some PB blaster or such. Then back out, in, out.
  • My buddy's Milwaukee power socket wrench did wonders here. The hammering action really worked that bolt on the in/out/in action. I think I saved two bolts with it.
  • If one of your four bolts doesn't want to break, take the other three out and (since you already removed your door from the hinge) you can tap/rotate the whole hinge bracket with a hammer. This broke the one bolt I had ripped up and couldn't budge, fortunately.
Most of this was learned as I made my way thru the first 8 bolts of the first door. By the time I got to the 2nd door, I removed all 8 without damage. Follow these tips ahead of time and you should avoid messing up any bolts.
 
Last edited:
P1K5Dave

P1K5Dave

Well-Known Member
Lifetime Member
Club Contributor
Jul 11, 2020
2,244
8,419
113
Petoskey, MI
Ownership

  1. 1000-5
More tips:
  • Clean out your tailgate hinge pin holes before installing your new hinge pins in them. I had to run a Dremel tool with a sanding drum in one of mine because it was so tight with all the buildup and corrosion in there. Use some grease. Make sure it slides in nice and smooth, don't try to tap them in, you'll regret it.
  • Screenshot 20220513 085022
  • The end-cap nuts lined up surprisingly well, and I found there was no way to get them in without tapping them. I thought it was going to be a nightmare, but it went well because they lined up nicely.
  • Screenshot 20220513 084752
  • Lastly, if you're running Mudbusters, you're going to need to do some trimming, and you'll lose the only mounting point you had for the back flappy part that goes aroung the cage bar.
  • 20220510 184752
    20220510 184809
  • I think I'm going to close up that slot that goes around the bar with some rivets, and do some rubber work there to better close the gap around the bar that allows mud to spray under my roof. I'll show that when I get to it.
 
Last edited:
P1K5Dave

P1K5Dave

Well-Known Member
Lifetime Member
Club Contributor
Jul 11, 2020
2,244
8,419
113
Petoskey, MI
Ownership

  1. 1000-5
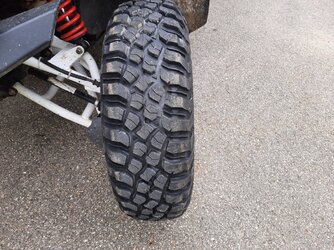
New tires are on order. I'm going with the BFG KM3s. (30x10x14)

I was initially planning on the Frontline ACPs, but eventually talked myself out of them because:

A) I don't run enough mud to really need the Frontlines aggressive pattern and

B) I'm still running 4 miles of pavement to and from the trails, and I'm concerned about their wear.

I think the BFGs will be more likely to hold up to the pavement runs, and since theyre a mud-terrain, I think I'll get all the mud performance I need, occasionally.
 
  • Like
Reactions: CID and Lady01
P1K5Dave

P1K5Dave

Well-Known Member
Lifetime Member
Club Contributor
Jul 11, 2020
2,244
8,419
113
Petoskey, MI
Ownership

  1. 1000-5
Replaced all the rear knuckle bushings today. Sometime in the next few days I'll do a write-up on that job, a little uglier than you'd think!
 
Last edited:
  • Like
Reactions: Lady01 and CID
P1K5Dave

P1K5Dave

Well-Known Member
Lifetime Member
Club Contributor
Jul 11, 2020
2,244
8,419
113
Petoskey, MI
Ownership

  1. 1000-5
KM3s I chose to go with

Screenshot 20220524 223946


Frontline ACPs I decided to skip. I may still try a set after the KM3s, depending on how I like them. That ACP tread design just appeals to me.

Screenshot 20220524 223846
 
PJon

PJon

Well-Known Member
Lifetime Member
Dec 9, 2020
792
3,214
93
Arizona
Ownership

  1. 1000-5
P1K5Dave

P1K5Dave

Well-Known Member
Lifetime Member
Club Contributor
Jul 11, 2020
2,244
8,419
113
Petoskey, MI
Ownership

  1. 1000-5
@Blownzuki KM3s, is that the tire you were running on the 1st MOM ride?
You've got me wondering TripleB - was it a good report or a bad report?

Anyway, baby did get her new pair of shoes today. I need to straighten out a few things in camber and alignment before the weekend rides and I'll report back then.

20220526 185144 20220526 185151
 
TripleB

TripleB

Well-Known Member
Lifetime Member
Aug 13, 2018
15,161
135,218
113
Caryville, Tennessee
Ownership

  1. 1000-3

  2. 1000-5
You've got me wondering TripleB - was it a good report or a bad report?

Anyway, baby did get her new pair of shoes today. I need to straighten out a few things in camber and alignment before the weekend rides and I'll report back then.

View attachment 336164 View attachment 336165
I'm not Sure if those are the same tire as @Blownzuki . But his filled with mud and became slicks. It became a rough day for the old Talon.
 
advertisement

About us

  • Our community has been around for many years and pride ourselves on offering unbiased, critical discussion among people of all different backgrounds. We are working every day to make sure our community is one of the best.

User Menu

Buy us a beer!

  • Lots of time and money has gone into making sure the community is running the best software, best designs, and all the other bells and whistles. Care to buy us a beer? We'd really appreciate it!

    Beer Fund!

    Club Membership!