P500 Mighty P500 Build

Description of my personal build. I started with a blank sheet of paper, let uncle honda build the basic vehicle then added the stuff that I didn't think of at the time, wasn't allowed to do or was too expensive for a entry level SxS.
lee

lee

Village Idiot
Lifetime Member
Club Contributor
Apr 4, 2013
2,383
13,487
113
Springfield Ohio
Ownership

  1. 500
Lee's Garage Index:

Forgot to leave a blank thread for the index so I'm hijacking the intro.

Index

  • New vehicle prep #2, 3, 5, 6, 7, 8, 9, 10, 11
  • Planning and other thinking #12
  • Tire pressure #16
  • Winch / plow mount #17, 18
  • Water sealing around the pedals #19
  • After market tires (not yet)
  • Windshield #23
  • Rack storage #21
  • Top and back #22
  • Navigation: mounting a tablet to the ROPS #29
  • Front locker install #31, field testing #32
 
Last edited:
lee

lee

Village Idiot
Lifetime Member
Club Contributor
Apr 4, 2013
2,383
13,487
113
Springfield Ohio
Ownership

  1. 500
This information is copied from an older post in order to collate it in one place.
If you want to see the original (for the discution ) go here:

Getting to know the MIGHTY 500

If I were to acquire a brand new (year old) P500 this is what I would do to it before riding it hard.

E2C57808 F0C8 454F AFEA 36CB15DA0980


These are things I have heard on line or through experience may be an issue with new SxSs or ATVs.
Also, I’m cheap and got a deal on a unit that has been sitting in a warehouse for the last year of so.
I think the term I heard once was ‘crate rot’, just from sitting around there are some things that need checking (hopefully your dealer has taken care of it).
The Mighty P500 was manufactured a little over a year ago so it has been sitting around somewhere for a while.

Upload 2019 10 12 23 33 9


Also, if you decide to do something similar you will become more familiar with your SxS, and as a bonus you will remain relatively clean (until you start messing with the filter oil) because the SxS is not dirty yet.
Believe me, once you take it out on a trail ride, no matter how many times you pressure wash it (FYI manual says don’t do that so this is just hypothetical) it will never be this clean again. Ever.
 
Last edited:
lee

lee

Village Idiot
Lifetime Member
Club Contributor
Apr 4, 2013
2,383
13,487
113
Springfield Ohio
Ownership

  1. 500
Record of seals

I’ve seen guys ask if there diff or engine was leaking or whatever.
Then they have a picture of a wet area around the drive shaft that looks all too normal.
So my thinking is to take a picture new and a follow up later to have a base line for comparison.
These pictures are just a record for later if I get paranoid.

I’ll just attach one picture as an example, rear of the engine and rear drive shaft.
The yellow foam you see is a little Fluid Film I sprayed on exposed metal surfaces to slow the rust down.
Obviously, I have pictures of the other parts.

DD7C5EE8 9C10 4D03 9EC6 08D7E8847B29


Fluids

I keep hearing about occasional low fluid level in a new SxS.
It seems like a simple thing to check just to make sure.

The front and rear finals are easy to check.
17mm combination wrench, when putting the plug back in I lined up the yellow paint mark to set the torque.
Except on the front the marks didn’t line up before I removed it.
No idea what is up with that.

Picture shows the rear, you can clearly see the level of the oil (and teeth on the ring gear).

03CBE1FD F201 4715 A142 8CE78632172F


The engine oil is easy to access from under the seat.
Owners manual says to run the engine for several minutes then shut it off and let it sit for a few.
Reaching for the dipstick I could feel the heat radiating from the muffler, be careful that thing is hot and just out of view right above the dipstick.
Engine oil was good.

BD8A97E1 DB5A 4B99 B95D 85087F21676B 1


Next is the antifreeze in the radiator. (Actualy this is out of order, do the radiator before warming the engine up)
Radiator and the overflow tank had fluid, there are lines on the back side of the overflow tank to show you the max and min.
While doing this I turned the little wire hose clip thing to point to the side so it wouldn't dig in to my hand next time I remove the cap.

20191013 081602 1


It's interesting to note the lable on the radiator cap reads sideways.
Was the engineer asleep when they speced that out?
Maybe he was dyslexic and can read upside down and side ways just as well as right side up.
Or is this how the parts came out of the parts bin and not fixing it saved half a yen.
I guess you will never know.

Anti-seize on the clutch adjust bolt


This is a personal pet peeve.
I have an old Rancher 350 where I never adjusted the clutch until one day I couldn’t.
When I went to adjust the clutch the screw was stuck.
I reefed on it till I thought I was going to mess up the screw driver slot.
The Rancher is still not adjusted, so I figure I better anti seize the Mighty P500 before it’s too late.
I started by marking the screwdriver slot orientation with a sharpie.
Drop the jamb nut off, apply anti-seize and screw it in and out to spread it around

Upload 2019 10 12 22 12 22


There is a great instructional video for resetting the clutch adjustment.

P500 - Pioneer 500 Clutch Adjustment (Video)
 
DG Rider

DG Rider

Member: Triple Clutch Club
Lifetime Member
Aug 14, 2013
9,443
42,988
113
Casa Grande, AZ
Ownership

  1. 700-2
....wait a minute....you didn't actually own a 500 until now? I musta missed that somewhere, but welcome to the club (again).
You're right in that I'm not really a "builder" of machines. The mods on the 500 are basic stuff I felt was necessary to keep my from trading it when I really shouldn't. I tend to leave well enough alone and just run it. Getting out is the goal, and you don't need Walker Evans shocks to do that...though you may want them.

I suspect you have serious fab skills, so going off script gets my vote, FWIW.

As far as the unfinished projects....I'm starting to warm up to the concept of the "Garden jeep", ala - Dirt every Day. Where the jeep is just sitting there as decorations. You may or may not ever fix it...but it sure beats looking at garden gnomes.
 
lee

lee

Village Idiot
Lifetime Member
Club Contributor
Apr 4, 2013
2,383
13,487
113
Springfield Ohio
Ownership

  1. 500
Air Filter

This thing has been sitting for a while so I wanted to make sure the air filter was good to go.
I have been using the Pro-Honda bio based filter oil.
After cleaning the filter with solvent (gas) and letting it dry I re-oiled it.
The manual says to use 0.7 oz, that’s like ½ a shot glass worth, it also says to pour the oil inside the filter, who knew?

4634713A DEA9 4401 9297 D1EE0312AC3C


I ended up pouring about a full shot glass worth to the inside of the filter and using a plastic bag to squish it around.

159835 50e332cf55aa59c00e78821178c058b2


Reassemble the core to the filter, drop it back in the air box and tighten the hose clamp.
Don’t forget to wiggle the wedge back in on top of the filter.
I’m guessing the engineer that thought that up had no problems inserting that thing on his computer CAD program.

159836 15adc771dbbe26fe320b5c1ac911c9d3


When putting the lid back on it only goes on one way.
Look at the clips, two are horizontal and two are at an angle.

159837 b04734aaa1cbd4c3cce93deb27343325


One last thing before moving on from the air filter stuff.
When I first got my old Rancher the air box drain was full of oil from the air filter, I guess it had been sitting around a while.
But the oil was clear, I pulled the drain thing (it's like a short tube with the end seals off) off and it went everywhere.
On the P500 there is a drain tube on the outside of the frame, I checked mine and there was no oil in it this time.

Upload 2019 10 12 23 6 50
 
lee

lee

Village Idiot
Lifetime Member
Club Contributor
Apr 4, 2013
2,383
13,487
113
Springfield Ohio
Ownership

  1. 500
Spring Pre-load

When the P500 was first released in 2016 the ground clearance was reported as 9.6”.
Then there was some sort of mysterious letter sent out with a sticker to be applied to the roll cage.

P500 - Non-compliance sticker

And the 2017 P500 ground clearance was reduced to 8.5”.
Also, the shocks received spring pre-load adjusters front and rear.
My intention of this series is to discuss what should be done to a stock P500, not throw out some crazy modification ideas.
If you want to go crazy might I suggest:
P500 - long travel kit is under construction
P500 - Portal hubs on P5?! Is it possible?!


My 2018 has 8 5/16” ground clearance.
This seams low, and realistically no matter what I do the ground clearance of the P500 will always be a little low.
Adjusting the springs will get back some of the original ground clearance that the P500 was intended to have.


219CAC0E 4AB4 4FF6 8322 2B2B44772202


Both front and rear were delivered on the one from the lowest setting.

Upload 2019 10 13 16 34 15


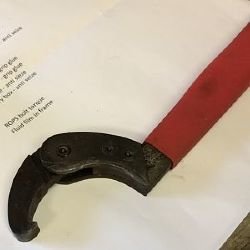
To adjust the spring pre-load I jacked up each end in turn and rotated the spring perch using a spanner wrench from Harbor Freight.

159974 dea63617ff89f075f735185bb5d28c5e

I cranked them up to the highest setting.

15125A69 4612 4C03 B4D0 B96C1D49C122


And the ride height went up to 8 ¾ “.

58860597 0AF5 4634 887F 88A77AB45063


Not a lot but 7/16” of free ground clearance.

Alignment

I did a quick toe check with a measuring tape.
The tires have a serious mold parting line that defines the center of the tread.
I measured the front and rear center to center dimension.
Front: 41 7/16”
Rear: 41 3/16”
So ¼” of toe out, well within the spec.
 
lee

lee

Village Idiot
Lifetime Member
Club Contributor
Apr 4, 2013
2,383
13,487
113
Springfield Ohio
Ownership

  1. 500
Roll cage bolt torque

I have heard that the roll cage is assembled at the dealer or at a warehouse but not at the factory.
And, some people have posted stories of the bolts being lose.
So I checked the torque on the roll cage and the seat belts.

159992 a62bbd8d4cd7a2f4c5526f6c44ebbce8


I used a 6 point 14mm deep socket to reach the front bolts under the fender.
They are hard to see from above but there is plenty of access from underneath or with the hood off.

Upload 2019 10 13 17 45 9


Most of the bolts where ½ to ¾ turn lose from the manual specified torque (36 ft*lb).
Also the bolts felt a little funny, like that stretch just before the snap.
I think it was the roll cage tubes squishing to conform to the final shape.
Also I noticed the bolts in the middle behind the seat back where torqued and had paint marks, all of the not so tight bolts (not really loose) did not have the paint marking.
So I’m guessing the paint marked ones were done at the factory.
The seat belt bolts where good.

Glueing Door Rubbers

I have heard that the door rubber bumpers can fall out.
So preemptively, I am glueing them in with grip glue.
I popped them out by pulling on the bumper and shoving one corner of the back side in to the hole with a trim tool.
Apply the glue to both at the same time.

F1AF555F DFA4 42E2 94EC B29B078843FB


Tilt the bumper and tuck one side of the back through the hole.
Then I used the trim tool to pry the back until it was seated.

F3A65056 7E28 40F3 A21F 1ABC6F3F766C


Once it was back in place I rotated the bumper to spread the glue evenly and repeat for the other bumbler.
Then I closed the door to hold the bumper till the glue was dry.

6B9F1F4E 76C7 4AA4 8268 764FA541D2C0
 
lee

lee

Village Idiot
Lifetime Member
Club Contributor
Apr 4, 2013
2,383
13,487
113
Springfield Ohio
Ownership

  1. 500
Seat Rubbers

I decided to glue the seat rubber cushions as well.
There is some possibility that this is not a good idea but I don't want to lose one on the Wednesday ride of the Takeover and have four more days of riding.
The seat rubbers fit over pins on the seat frame.
They provide some cushioning but more importantly they hold the seat from moving or flying off when they are not being held down with a great weight.

The method of glueing them is similar to the door rubbers but you do not have access to the back.
So I tucked one side of the lip on the back in to the seat back and then stuffed the other side in with a trim tool.
You could substitute a flat blade screw driver just as well.

17DD517A 0176 44E2 8586 577FE989F0FD 1


Once the lip on the back is fully tucked in I rotated the rubber to spread the glue evenly.
When both rubbers where glued I replaced the seat to make sure the spacing of the rubbers was correct.

A79A25B7 8AE1 480A 85FA FA6042780BFA 1


Anti-seize and Fluid Film

The last few sort of run together. (And are out of order according to my list)
I wanted to anti-seize the bolts holding the skid plates on so that they would be removable later.
The bolts are threaded in to the frame rails with out a welded on nut on the back side, and the inside of the frame is not painted.
So, the inside of the frame will rust and lock the bolts in place if somthing is not done.

My plan was to remove each bolt, spray Fluid Film in to the frame rails and coat the bolt with anti-seize before replacing the bolt.
Fluid Film is an oil used to slow rust.
It's popular with farmers, made from sheep lanolin.(it smells like a wet sheep)
It's avalible in bulk to be sprayed on with a garden sprayer or in aerosol cans.

Spraying Fluid Film in to the frame rail:

159707 3000b7e8362a278c5ab5bb4d9925f253 1


Replacing the bolt with anti-seize applied:

64E46019 099E 42C7 BDB5 1822E5F9C0D5


I marked the bolt heads with a Sharpe as I went along, so I wouldn't get distracted and skip one.
After doing this it dawned on me if I had marked the washers it would have been easier to see what was done.
 
lee

lee

Village Idiot
Lifetime Member
Club Contributor
Apr 4, 2013
2,383
13,487
113
Springfield Ohio
Ownership

  1. 500
One of the reasons for doing all this stuff was to gain a good understanding of the Mighty 500.
Doing the skid plate bolts was enlightening.
There where 3 bolts missing.

One missing at the rear of the main skid plate:

20191013 204923


Two missing on the front bumper:

20191013 205203


I happen to have a stock of metric fasteners so I replaced them.
All three of the missing bolt holes where misaligned.
The trick to dealing with this is to loosen all the fasteners so the part is lose, install the missing bolt then tighten them.
The bolt at the back of the main skid plate also passes through the rear skid plate.
Before I figured out what was going on I ended up removing the main skid so I could see the threaded hole and align the rear skid plate.
On the main skid plate there are two holes that are a key hole shape.
Leave those bolts lose, place the large end of the key hole over the bolt head and slide the skid forward.
Now you can let go and it will stay in place while you start the other bolt:

658B39BE E466 4D10 9A60 8D61E73B535C
 
lee

lee

Village Idiot
Lifetime Member
Club Contributor
Apr 4, 2013
2,383
13,487
113
Springfield Ohio
Ownership

  1. 500
Fluid Film in the frame

I also sprayed Fluid Film in to any of the frame rails I could get the cans nozzle in to.

160060 a525e4b085c74a26694c88ebffa7d8d7


And a view inside the main frame rail after spraying Fluid Film:

CAFB671B CACF 4012 85BD 347217A17967


Anti-seize the Battery Box Bolts

There are numerous complaints about the battery box bolts .
And a like number of comments about the engineer responsable for this design. (I'm sure it was an honest mistake where he was misled about how well that structure worked (Or didn't work))
The nuts mounted in the box will spin and can be a royal pain.

I figured if I dropped the bolts out before to much time elapsed they would be easyer to get out.
I applied anti-seize when replacing the bolts.

73FD4B38 F76E 4D93 8141 7F756DDBD5DD


While I had the lid off I poked around in the battery box a little.
At the top of the box you can see the offending captured nut.
I pulled the fuse box lid, you can see the label for the fuses and what they do.
There are also a number of spare fuses (and a big one (40A) on the back side of the battery box lid).
You can also see the rubber sponge thing that has become detached from the top of the box.
Not sure what that is about, maybe drip rail to keep water from adhearing to the top and dripping down the back of the box on the components there.
Seams like some sort of desperate last minute bandaid to make some manager sleep better at night.
My battery box lid fits pretty good so I'm not going to wory about it.
 
advertisement
lee

lee

Village Idiot
Lifetime Member
Club Contributor
Apr 4, 2013
2,383
13,487
113
Springfield Ohio
Ownership

  1. 500
And finally (yes this thing is going to end) I added my state issued plate so I am legal to ride in Ohio.
To balance things out I added a plate I got at the 2016 Takeover.

8303955D C8A1 4B0B A6AE CA500774C942

C8029E0B 7077 4CD9 ADA7 AB5D896A5D8D


You would think with as many states that require a plate for off road or allow on road registration honda would provide a place to mount the plate.
Oh well, they fit on the fender pretty good.
 
lee

lee

Village Idiot
Lifetime Member
Club Contributor
Apr 4, 2013
2,383
13,487
113
Springfield Ohio
Ownership

  1. 500
Edit: decided to go threw and add update comments as stuff gets done (in purple).

Trying to plan what I want to do, this was originally posted in a discution about the cost of mods on a build.

P500 - Poll $ spent on P500 Mods or Accessories

Never thought too much about it till I saw a vlog talking about building an overlanding rig.
Guy suggested making a list with three categories, must, want and would be nice.
Sounded like a good idea to organize and conquer my build.

Some of the stuff I want is specific based on what I want.
Don't bother trying to talk me off the cliff with cheaper alternatives.
(Not hanging a Badland winch on my SxS)

Must:
  • winch (WARN) with Honda mount. Done
  • front locker (TORQ locker) Done, no power steering so waiting to see if this works ok.
  • flip up windshield (Super ATV) Done (they have great sales - keep an eye out for them)
  • roof (Honda) (done, got a deal on the Honda roof/back panel)
  • Honda cargo tray (wife wants this, she is convinced the engineer that made this was a genius so its a must item). Done
  • tires (Bighorns) (Waiting for my lotto ticket to come in)
  • skid plate (Honda aluminum or Rickochett)
  • side skid/rock slider (Rickochett)
  • Helmets (Simpson OTW shorty)
Want:
  • Shocks (Walker Evans)
  • back panel (Honda soft panel)(done, went with the combined roof/back panel)
  • Lights (Talon leds)
  • Cargo box (not sure, ammo boxes or some plastic box?) (went with the Honda accessory soft bag set)
  • Jack (36" Hi-Lift to flip it back up on the wheels when riding alone)
  • spare (front stock tire?)
  • glove box (chugbox or roll my own?)
Nice:
  • doors
  • snow plow Done (and it didn't snow this year)
  • soft cover (Honda - to cover the vehicle while inside the trailer so we don't get dirty living in the trailer traveling across the country) Done
  • grab/accessory bar (probably have to roll my own but I like what @Hondasxs has)
  • Radio (Bofang)
So that should about cover it, maybe make another list for my truck and one for my toy hauler build.
Oh but wait. There's more.
Just for fun I added a column (yes I did this in excel) for a rough cost.
Some items i already have so no additional cost.

Must:
$3100
Want:
$2050
Nice:
$770
Grand total = $5920
(It was during this phase that I moved the shocks from must to want, looks more balanced).

Holy cow - why didn't you guys warn me this s*** was too expensive before I got started?
When I was in high school my mom would lecture me about how I should be doing my homework and not in the garage fooling with my dirt bikes - you'll never make a living like your father playing with that stuff (Japanese tiger mom in case you didn't know already).
She should have warned me that I would go broke even at the 'entry level' end of the spectrum.

I'ma thinking we will be doing some pretty stock rides for a while.
 
Last edited:
nctrailboss

nctrailboss

Well-Known Member
Supporting Member
Jun 30, 2018
440
1,454
93
north carolina
Ownership

  1. 500
This is how it played out for me,in order.
17' model bought in 18' for 8300 otd
A3500 superwinch on kfi mount 169 and 59
Honda half windshield 150
Honda soft top 99
1 inch spacers 120
Tusk rear panel 49
26x9 BH 2.0's on Delta black wheels 700 or so
Tusk PS 489
Tractor Supply box 79
Front locker 329 I think
Aux battery and disconnect 110 or so
Homemade top half windshield 110
8 inch led on front 80
4 inch square led {x3} 90
Honda brush guard 2 0r 3 hundred
2015 ecm and speedometer pod[non-auto mod]280
white plastic 160
EMP plastic hard top 280
Walker Evans shocks 1000

If yall want to add it up,that's fine.I don't want to know.


  • Like
Reactions: Dp5hunter
lee

lee

Village Idiot
Lifetime Member
Club Contributor
Apr 4, 2013
2,383
13,487
113
Springfield Ohio
Ownership

  1. 500
Bumped in to this discussion on tire pressure so I thought I would post it here.
For the original thread go here (this was post #7 but, since your interested in the subject matter I linked post #1):

P500 - Air Pressure, Stock Tire

Tire pressure is dependant on terrain.

Soft or muddy = low, maybe approaching 1/2 the recommended pressure.
If you go too low you will debead a tire.
But somtimes it's better to drive gently with low pressure than to be stuck.

Hard pack dirt, small rocks = medium pressure, maybe 7~8 psi.
A little bit softer pressure than recomended will improve the ride a little but you still have half decent handling.
Too soft and the tires push too much when turning or you might hit a rock and pinch a tire.

Rocks, steps and big roots or a heavy load = pressure listed on the tire placard.
The possibility of pinching a tire is increased so run more air to prevent that.
The ride harshness is bad but that is better than walking.
 
lee

lee

Village Idiot
Lifetime Member
Club Contributor
Apr 4, 2013
2,383
13,487
113
Springfield Ohio
Ownership

  1. 500
Added a winch and a plow (snow plow just to be clear, I have a single bottom 3 point for the tractor).
I thought I would get creative and do a little mix and match with the plow/winch set up.
Wanted the honda winch mount to make the front end neat and tidy (winch dose not block the radiator and the mount works with the bumper).
But, the honda plow mount looks like it hangs down more than I wanted.
The WARN plow mount looks similar but it is tucked up out of the way, so I ordered the WARN plow mount.
Picture of most the parts before I got started.
IMG 1594


I figured that WARN designed both plow mounts and the the honda winch mount so it should be compatible.
WRONG.
The WARN plow mount has to slide up when installing the front bumper but it can't because it hits the winch mount.
I was able to flex the front bumper and get it on but then the plow mount contacted the end of the winch and the free spool knob was jammed.

So, I modified the plow mount by cutting a sliver off, and some of the material that jammed the free spool knob.
This eliminated one of the mounting bolt holes so I welded the one mount bracket on.
In the picture I laid the material cut off on the table so you can see what it took:
IMG 1623

The end of the mounting bracket was also trimed and I opened up the hole to a slot to make bending - unbending easyer.

After this modification things went together like they where supposed too.
Picture showing the clearance between the free spool knob and the plow mount.
IMG 1630
 
  • Like
Reactions: JACKAL and Mudwing
lee

lee

Village Idiot
Lifetime Member
Club Contributor
Apr 4, 2013
2,383
13,487
113
Springfield Ohio
Ownership

  1. 500
Picture of the whole kit assembled and ready for snow (yes I know, needs a windshield (and a winning lotto ticket))
IMG 1635


Recently there was a thread that discussed the WARN plow mount.
P500 - Warn Plow Set-Up
One of the participants posted some pictures of the WARN mount with a top mount winch.
There are pictures from a similar angle as this one, for comparison.
IMG 1637


Also, along the way I switched over to a rope with the Epic hook.
I like the look of the Epic line of stuff but it's becoming pretty common.

In the future I would like to swap out the fairlead and add tow shackles to the bumper.
Again using the WARN Epic line of components.
 
  • Like
Reactions: JACKAL and Mudwing
lee

lee

Village Idiot
Lifetime Member
Club Contributor
Apr 4, 2013
2,383
13,487
113
Springfield Ohio
Ownership

  1. 500
While I had the cover off the battery box I noticed there where some extra wires in there.
The dealer had added a connector for a trickle charger.
Cool, saves me some effort.

IMG 1625


When running the power cables to the rear I was going to drop the skid plate.
But I also wanted to try sealing around the peddles, p500s are notorious for dumping water on your foot.
My stratagy was to add weather striping between the plastic front foot well and the steel plate on the frame that holds the pedals (and a bunch of other stuff).
So I pulled the plastic off from the top.

Weather striping is 1/2" wide and 3/4" tall with a peel off stick on backing.
20191211 203019


After pulling the rather large and awkward front floor out I realized I needed to mark the metal plate on the frame as it is huge with no indication of where the opening in the plastic front floor is.
So I wrestled the plastic front floor back in to place and marked the opening with a sharpe and pulled the plastic back out.
Then I noticed the metal plate was not clean so I cleaned it and the sharpe marking was gone.
So, jamb the plastic back in, mark the opening, pull the plastic back out.
And finally I stuck the weather strip in place.

IMG 1633


You can see the opening of the plastic front floor contacts the weather strip along it's center.
This came out pretty good (I was expecting worse).

I know another member / vendor is expermenting with a rubber sheet to cover the whole dash area to stop water and air flow in to the cabin.
My weather strip will not block water coming over the top of the metal plate but that is so high up I figure if the water is that deep I will not notice my foot getting wet.
And, I figure if this doesn't work, the trigger rubber boot will be done testing and I can buy one of those.
 
advertisement

Similar threads

About us

  • Our community has been around for many years and pride ourselves on offering unbiased, critical discussion among people of all different backgrounds. We are working every day to make sure our community is one of the best.

User Menu

Buy us a beer!

  • Lots of time and money has gone into making sure the community is running the best software, best designs, and all the other bells and whistles. Care to buy us a beer? We'd really appreciate it!

    Beer Fund!

    Club Membership!