NewHere2
Village Idiot In Training
Lifetime Member
Supporting Member
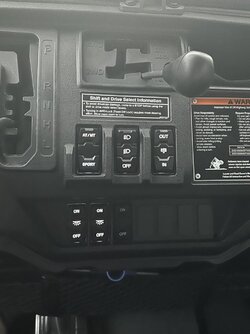
If you are contemplating installing Illuminated Switches in a Base, Deluxe, or Trail Model Pioneer; try this.
First remove the far right switch. My Deluxe had a blank in this position. Reach thru the hood, up under the dash. Squeeze the upper and lower locking tabs together. Then push outward on the blank/ switch.

Upper and lower tabs on blank.
Once the right hand blank/switch has been removed, insert a 3” C-clamp into the open space.

With the C-clamp in place and no pressure on it, from the front of the vehicle , reach thru the hood, under the dash and push up and hold the bottom locking tab on the middle switch. With your other hand reach thru the windshield and lightly tighten the C-clamp. The bottom of the switch will pivot outward about a 1/4”.
Note : If your C- clamp won’t stay in place, insert a small piece of metal under the pivoting foot. I used a metal square.

At this point, insert a small screw driver at the top of the switch, between the switch and the dash. Lightly apply pressure upward and the top tab should release allowing the switch to pop out.

Repeat the process for the headlight switch on the left.
This is the C-clamp I used.

The connections for all the switches are mounted under the dash behind the “Your Gonna Die” warning label. I removed the label to access the wire mounting clips.

Hope this helps. It worked great for me. @HondaTech
First remove the far right switch. My Deluxe had a blank in this position. Reach thru the hood, up under the dash. Squeeze the upper and lower locking tabs together. Then push outward on the blank/ switch.
Upper and lower tabs on blank.
Once the right hand blank/switch has been removed, insert a 3” C-clamp into the open space.
With the C-clamp in place and no pressure on it, from the front of the vehicle , reach thru the hood, under the dash and push up and hold the bottom locking tab on the middle switch. With your other hand reach thru the windshield and lightly tighten the C-clamp. The bottom of the switch will pivot outward about a 1/4”.
Note : If your C- clamp won’t stay in place, insert a small piece of metal under the pivoting foot. I used a metal square.
At this point, insert a small screw driver at the top of the switch, between the switch and the dash. Lightly apply pressure upward and the top tab should release allowing the switch to pop out.
Repeat the process for the headlight switch on the left.
This is the C-clamp I used.
The connections for all the switches are mounted under the dash behind the “Your Gonna Die” warning label. I removed the label to access the wire mounting clips.
Hope this helps. It worked great for me. @HondaTech
Last edited:


