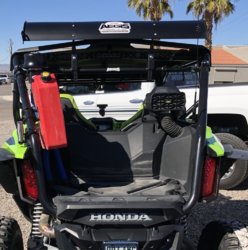
Talon Air Cleaner concern on my 1000x

D

DRKnight

Well-Known Member
Jan 31, 2019
136
269
63
Yuma, AZ
Ownership

  1. Talon X
I got my S&B Particle Separator up and running. Turned out to be a very easy install.
At least if you have a welder and a way to cut and drill metal.
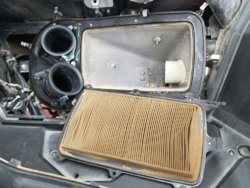
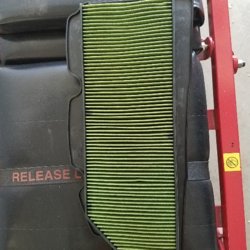
1 This was my air filter after approximately 300 miles of desert riding and I was not following anyone. Stock system, no Particle Separator.
I had posted in a earlier post about my fuel mileage dropping to 14.3 mpg and not knowing why.
This explained it.
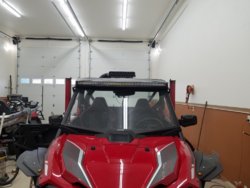

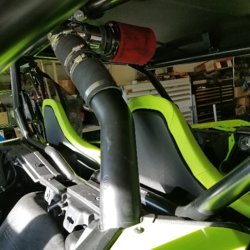
2 Front view showing unit as low as possible.
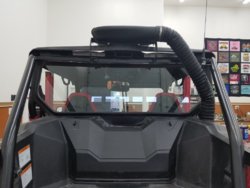
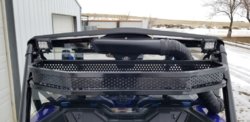
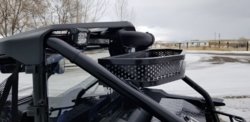
3 I have a rear full safety glass window, so there is no roll bar to mount the S&B to. I used a length of 1" x 2" rectangular tubing welded to the down sloped roll bar for mounting the unit.
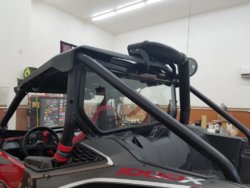

4 This view you can see the mounts I made to connect the unit to the cross bar. I used 3/16" plate steel and cut them out. I welded the mount bracket to the cross bar and used the screws from the S&B kit to mount it.
The S&B Particle Separator kit I used for this was #76-2001
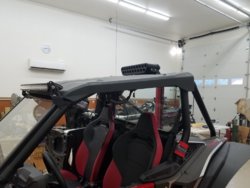
5
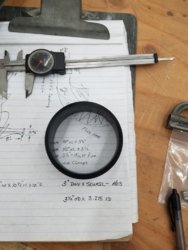
6 This ABS 3" reducer was needed to connect the 3 1/2" flex hose to the air box on the Talon.
7 Once the stock air intake unit was removed from the air box, leaving the rubber coupler attached, I slid the ABS reducer over it. It is a tight and secure fit, that did not need anything to secure it. I then was able to slide the 3 1/2" flex pipe onto it and clamp in place.
8 You will need to cut a 4" hole in the top of the panel. I did not have a 4" hole saw and used a 4 1/8" which is just a little big, but okay.
I secured the flex pipe with a wire tie to the plastic skirt by drilling two holes in it.
9 To dress up the hole cut out and protect the S&B flex pipe. I used 3/8" wire flex tubing.
10 To keep the S&B low and as close to the front as possible and look right. I had to cut out the top to match the dust exhaust port of the S&B. This keep the unit outside of the cab area and retained the look and integrity of the plastic top with the exhaust outlet under the roof line.
11 To give more rigidity to the S&B flex tube ( not sure it's needed ) I added a support and used the velcro straps from the kit.
The kit came with a 39" length of flex tube which was the perfect length.
For the electrical harness install, I used a toggle switch between the hot lead to further control the unit and found my own key on activation point from the Honda accessory wiring harness.
12 So far I have about 100 miles on it but have not checked the filter.
I am going to run it awhile first.
The whole key to this was the ABS bushing to mount the S&B flex tube to the air box. With that anyone could make the unit work.
With my rear window I was able to keep water ect. out of the cab area with unit mounted in what I think was the best location.
For those without a front windshield, you could use the supplied roll bar mounting clamps and mount the unit under the top. Just make sure the unit you order has the 2" mounting hardware for the roll bar size of the Talon.
Any question I will try and help.
 
CumminsPusher

CumminsPusher

Just a Honda doing Honda things.
Lifetime Member
Supporting Member
Club Contributor
Oct 14, 2015
42,064
322,690
113
Washington/Idaho
Ownership

  1. Other Brand

  2. 1000-5

  3. Talon X LV
I got my S&B Particle Separator up and running. Turned out to be a very easy install.
At least if you have a welder and a way to cut and drill metal.

View attachment 144510 This was my air filter after approximately 300 miles of desert riding and I was not following anyone. Stock system, no Particle Separator.
I had posted in a earlier post about my fuel mileage dropping to 14.3 mpg and not knowing why.
This explained it.


View attachment 144511 Front view showing unit as low as possible.
View attachment 144512 I have a rear full safety glass window, so there is no roll bar to mount the S&B to. I used a length of 1" x 2" rectangular tubing welded to the down sloped roll bar for mounting the unit.


View attachment 144513 This view you can see the mounts I made to connect the unit to the cross bar. I used 3/16" plate steel and cut them out. I welded the mount bracket to the cross bar and used the screws from the S&B kit to mount it.
The S&B Particle Separator kit I used for this was #76-2001
View attachment 144514
View attachment 144515 This ABS 3" reducer was needed to connect the 3 1/2" flex hose to the air box on the Talon.
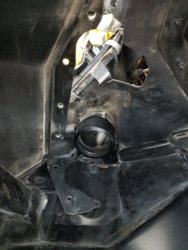
View attachment 144516 Once the stock air intake unit was removed from the air box, leaving the rubber coupler attached, I slid the ABS reducer over it. It is a tight and secure fit, that did not need anything to secure it. I then was able to slide the 3 1/2" flex pipe onto it and clamp in place.
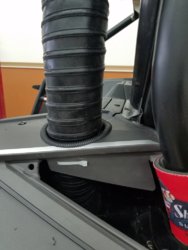
View attachment 144517 You will need to cut a 4" hole in the top of the panel. I did not have a 4" hole saw and used a 4 1/8" which is just a little big, but okay.
I secured the flex pipe with a wire tie to the plastic skirt by drilling two holes in it.
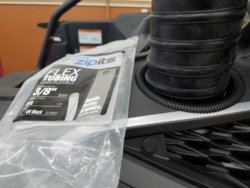
View attachment 144518 To dress up the hole cut out and protect the S&B flex pipe. I used 3/8" wire flex tubing.
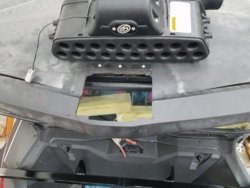
View attachment 144519 To keep the S&B low and as close to the front as possible and look right. I had to cut out the top to match the dust exhaust port of the S&B. This keep the unit outside of the cab area and retained the look and integrity of the plastic top with the exhaust outlet under the roof line.
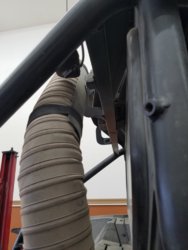
View attachment 144520 To give more rigidity to the S&B flex tube ( not sure it's needed ) I added a support and used the velcro straps from the kit.
The kit came with a 39" length of flex tube which was the perfect length.
For the electrical harness install, I used a toggle switch between the hot lead to further control the unit and found my own key on activation point from the Honda accessory wiring harness.
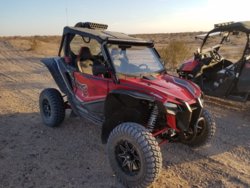
View attachment 144521 So far I have about 100 miles on it but have not checked the filter.
I am going to run it awhile first.
The whole key to this was the ABS bushing to mount the S&B flex tube to the air box. With that anyone could make the unit work.
With my rear window I was able to keep water ect. out of the cab area with unit mounted in what I think was the best location.
For those without a front windshield, you could use the supplied roll bar mounting clamps and mount the unit under the top. Just make sure the unit you order has the 2" mounting hardware for the roll bar size of the Talon.
Any question I will try and help.
Did a nice job on that. Looks good
 
H

hondabob

Well-Known Member
Lifetime Member
May 14, 2013
1,261
5,004
113
Prescott Valley, AZ
Ownership

  1. Other Brand

  2. 1000-3
Your air filter will be clean for over 10,000 miles with the Particle filter. T-Bob sent me your particle separator pictures, good job. I have a Uni Pre filter under my roof and since its in a clear air environment its still ok at 4,006 miles and I should get another 3 to 3 thousand miles. I don't follow in the dust, we usually have a one minute separation. My Pioneer 1000 has a Uni Pre Filter and a outerwear. My air filter is still clean with 18,000 miles on it.

20190422 172055 resized PreFilter1 18000Miles
 
devildog1000R

devildog1000R

New Member
Jun 25, 2019
19
21
3
Minnesota
Ownership

  1. Talon R
That is a very clean install i may be looking into doing this myself (no front winshield) so i may just mount it to the roll bar
 
S

sandshark

New Member
Apr 11, 2019
5
3
3
west hills, ca
Ownership

  1. Other Brand
I can't believe Honda did not use a Donaldson filter set up on the Talon. Both the X3 and XP use the Donaldson set up. Nothing gets past the filters and you tap them on the ground to get the dirt/dust out and you can hit it from the inside with an air compressor.
 
  • Like
Reactions: Loot
HavasuDave

HavasuDave

Well-Known Member
Dec 7, 2019
164
307
63
Arizona
Ownership

  1. Talon R
IMG 7762
I think the least expensive way to handle the really poorly designed Honda intake and filter design is a snorkel and filter. You can also opt for a pre-filter such as KWT or S&B. I have seen some people using a Uni filter on the pipe where it enters the plenum right before the filter.

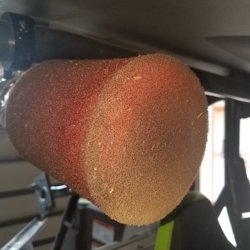
I have been beta testing the KWT pre-filter first on my RZR 1000, now on my 2020 Honda Talon R. In December KWT gave me a pre-production version 2, the X2 KWT pre filter to test.so I have one filter with over 600 miles on it , 300 with version 1 and 300 with version X2. I thought I need to get a test with a new filter and see how X2 does on its own. So below is a video of the results of a 122.6 mile dusty ride southeast of Parker, Az. I will also post a photo of the 600+ mile filter with the combined test. I easily could have kept running that filter and check it again at 1200 miles.

One last thought. Many folks can't because they have rear windows, or just don't want to mount the prefilter high or even above the roof (the least dirty air), for a variety of reasons. I wanted mine out of the way, so I mounted it facing backwards and low, behind the passenger seat not to block my rear view. This is not the optimal place to mount it and get out of the vortex of dirt pulled in from behind your Talon. So unless S&B or other methods are mounted low and in that area, you might be comparing apples and oranges.

Take a look:


The top photo the latest test 122.6 miles with Version X2.

The lower photo 600+ miles half on version 1 and half on version X2
IMG 8095

122.6 miles KWT X2

IMG 7969

600+ miles 300 miles on version 1 and 300 miles on KWT X2

IMG 7762
 
Last edited:
  • Like
Reactions: HUCK and stellarpod
HUCK

HUCK

Well-Known Member
Lifetime Member
Jun 21, 2016
1,047
2,319
113
ARIZONA
Ownership

  1. 500

  2. Talon X
Your air filter will be clean for over 10,000 miles with the Particle filter. T-Bob sent me your particle separator pictures, good job. I have a Uni Pre filter under my roof and since its in a clear air environment its still ok at 4,006 miles and I should get another 3 to 3 thousand miles. I don't follow in the dust, we usually have a one minute separation. My Pioneer 1000 has a Uni Pre Filter and a outerwear. My air filter is still clean with 18,000 miles on it.

View attachment 144616 View attachment 144617 View attachment 144618
We might have to change your name to SnorkelBob . 😂😂😂
 
  • Like
Reactions: CID
PaulF

PaulF

/\/\/\/\/\/\/\/\/\/\/\/\
Lifetime Member
Jul 1, 2019
1,462
4,814
113
Utah
Ownership

  1. Talon R
Some sort of pre filter is a MUST. My first filter lasted less than 300 miles. My second filter fared much better when I placed a lightly oiled UNI pad in front of it. It was still clean when I replaced it with about 600 miles on it but it had a little oil so I put a new one in when I installed my S&B.

This is after ~1000 miles with an S&B, it looks brand new and I may never have to replace it...

20200315 222114


And my inlet air tube and air box are pretty damn clean, just a tiny it of dust in the bottom...

20200315 222123


I am VERY amazed that the S&B removes that much dirt, they really do work as advertised!
 
  • Like
Reactions: CID and DRKnight
D

deltajp

New Member
Mar 2, 2020
11
22
3
Huntington Beach, CA
Ownership

  1. Do not currently own
Here is my solution using 2 1/2 inch aluminum intercooler tubing. You can find kits by Googling for about $100. Borrowed the basic idea from Mudpuppy on YouTube:
. Added a prefilter up into what I hope is clean air. Here are my results after 55 miles in the desert on my first trip. Tubing installation, intake air box (clean), and factory air filter (also clean). I use grease around the air filter edges and air box cover to minimize leaks. Throttle body inlets are perfectly clean.
20200401 003558
20200331 155612
20200405 155000
20200405 155044
 
Smitty335

Smitty335

Well-Known Member
Lifetime Member
Supporting Member
Oct 3, 2016
35,445
208,726
113
NWA Arkansas
Ownership

  1. 1000-3

  2. 1000-5
Here is my solution using 2 1/2 inch aluminum intercooler tubing. You can find kits by Googling for about $100. Borrowed the basic idea from Mudpuppy on YouTube:
. Added a prefilter up into what I hope is clean air. Here are my results after 55 miles in the desert on my first trip. Tubing installation, intake air box (clean), and factory air filter (also clean). I use grease around the air filter edges and air box cover to minimize leaks. Throttle body inlets are perfectly clean.View attachment 195070View attachment 195071View attachment 195072View attachment 195073
Reminds me I need to check mine!
 
advertisement
stellarpod

stellarpod

Well-Known Member
Lifetime Member
Apr 18, 2019
821
3,024
93
OKC, OK - USA
Ownership

  1. Talon X
Interesting set up and impressive results, @deltajp. I've installed a prefilter (UNI) inside the airbox. My only concern is that it is actually running inside-out from the way it was intended to be used. Don't know that it will matter, just a point of consideration. I have not had an opportunity to get any miles on it since installing, so I have no idea as to the effectiveness yet.

Steve
 
CID

CID

Well-Known Member
Lifetime Member
Supporting Member
Oct 27, 2019
5,430
24,949
113
SE Denver-ish
Ownership

  1. Talon R
I copied HondaBob's idea but didn't run up to the roof as that pointed the potential intake noise directly at the driver, maybe not an issue but I didn't know. This way I can extend straight up to raise the intake noise if needed. I have a leftover piece of the Teryx tube that will point the opening and filter about 30* rearward from vertical and about 8" higher.

I gXGK7GX M
 
  • Like
Reactions: TerryH
Mountain-Man

Mountain-Man

New Member
Dec 22, 2019
15
20
3
Idaho
Ownership

  1. Talon X
Some sort of pre filter is a MUST. My first filter lasted less than 300 miles. My second filter fared much better when I placed a lightly oiled UNI pad in front of it. It was still clean when I replaced it with about 600 miles on it but it had a little oil so I put a new one in when I installed my S&B.

This is after ~1000 miles with an S&B, it looks brand new and I may never have to replace it...

View attachment 190248

And my inlet air tube and air box are pretty damn clean, just a tiny it of dust in the bottom...

View attachment 190249

I am VERY amazed that the S&B removes that much dirt, they really do work as advertised!
I too am impressed with the S&B. I mounted mine just below the roof line as this machine is tall enough all ready. I modified it some as I do have a rear tinted poly window. It is a little noisy, but I can deal with it better than dirty air filters.

20200208 122041 20200208 122125
 
  • Like
Reactions: stellarpod
906UP

906UP

Well-Known Member
Lifetime Member
Supporting Member
Club Contributor
Jul 6, 2017
14,272
135,375
113
da Yoop
Ownership

  1. 1000-3

  2. Talon X
I too am impressed with the S&B. I mounted mine just below the roof line as this machine is tall enough all ready. I modified it some as I do have a rear tinted poly window. It is a little noisy, but I can deal with it better than dirty air filters.

View attachment 195096 View attachment 195098
Is that the Honda Talons S&B or did you modify one from a different model?

If it's the Honda version, can you post a pic of where the hose comes thru the body/vent panel by the rear window?
 
Tramguage1

Tramguage1

Texan
Moderator
Lifetime Member
Supporting Member
Club Contributor
Jul 2, 2015
7,479
30,604
113
Somereset, Texas
Ownership

  1. 1000-5

  2. 1000 6 Crew

  3. Talon X

  4. Talon R4 LV
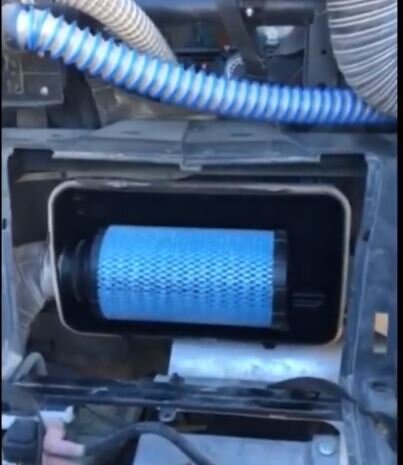
Just added the Uni filter inside the air box.
 
Last edited:
  • Like
Reactions: TerryH and 906UP
Mountain-Man

Mountain-Man

New Member
Dec 22, 2019
15
20
3
Idaho
Ownership

  1. Talon X
Is that the Honda Talons S&B or did you modify one from a different model?

If it's the Honda version, can you post a pic of where the hose comes thru the body/vent panel by the rear window?
It is the Honda Version. I do not have any pictures and my Talon is at the dealer currently getting a new front driveline. The passenger vent is removed and a new solid vent with the appropriate size hole is installed. There are molded tubes to connect the hose from the new vent to the airbox. It is a very good and easy install.
 
Last edited:
HUCK

HUCK

Well-Known Member
Lifetime Member
Jun 21, 2016
1,047
2,319
113
ARIZONA
Ownership

  1. 500

  2. Talon X
I copied HondaBob's idea but didn't run up to the roof as that pointed the potential intake noise directly at the driver, maybe not an issue but I didn't know. This way I can extend straight up to raise the intake noise if needed. I have a leftover piece of the Teryx tube that will point the opening and filter about 30* rearward from vertical and about 8" higher.

View attachment 195082
Don't be afraid of the noise . Mine is snorkeled up to just below the roof and then we cut through the back window and it is above the passengers head . At some speeds you can hear it but mostly not . HondaBob's is up under the roof between the seats as are several in our group . Some have windshields and back windows . All good
 
  • Like
Reactions: CID
HUCK

HUCK

Well-Known Member
Lifetime Member
Jun 21, 2016
1,047
2,319
113
ARIZONA
Ownership

  1. 500

  2. Talon X
Here is my solution using 2 1/2 inch aluminum intercooler tubing. You can find kits by Googling for about $100. Borrowed the basic idea from Mudpuppy on YouTube:
. Added a prefilter up into what I hope is clean air. Here are my results after 55 miles in the desert on my first trip. Tubing installation, intake air box (clean), and factory air filter (also clean). I use grease around the air filter edges and air box cover to minimize leaks. Throttle body inlets are perfectly clean.View attachment 195070View attachment 195071View attachment 195072View attachment 195073
Ya might want to make a cover for it . I had mine mounted there , had to run kinda hard in a moderate rain storm , it got pretty wet and I had water in air filter box when I checked it the next day .
 
  • Like
Reactions: stellarpod
906UP

906UP

Well-Known Member
Lifetime Member
Supporting Member
Club Contributor
Jul 6, 2017
14,272
135,375
113
da Yoop
Ownership

  1. 1000-3

  2. Talon X
Just added the Uni filter inside the air box.
I did the same, I bought 2 so I could just swap them out when they get dirty. The only rides were at RRB in early March and there wasn't any dust so I don't have much experience with it yet.
 
CID

CID

Well-Known Member
Lifetime Member
Supporting Member
Oct 27, 2019
5,430
24,949
113
SE Denver-ish
Ownership

  1. Talon R
Don't be afraid of the noise . Mine is snorkeled up to just below the roof and then we cut through the back window and it is above the passengers head . At some speeds you can hear it but mostly not . HondaBob's is up under the roof between the seats as are several in our group . Some have windshields and back windows . All good
Thanks, that's good to know. I'll get another Teryx tube to extend up to the roof if the lower position doesn't work out - rain for instance.

That aluminum tubing kit looks interesting but it's listed as 2-1/2" - the Teryx tube is just under a full 3". @deltajp - what's the outside dimension of that aluminum tubing?
 
advertisement

About us

  • Our community has been around for many years and pride ourselves on offering unbiased, critical discussion among people of all different backgrounds. We are working every day to make sure our community is one of the best.

User Menu

Buy us a beer!

  • Lots of time and money has gone into making sure the community is running the best software, best designs, and all the other bells and whistles. Care to buy us a beer? We'd really appreciate it!

    Beer Fund!

    Club Membership!