P500 2017 P500

Travissf

Travissf

Active Member
Apr 8, 2017
52
133
33
Minnesota
Ownership

  1. 500
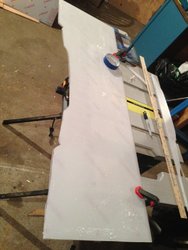
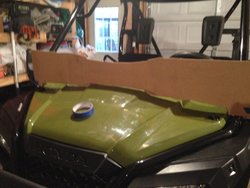
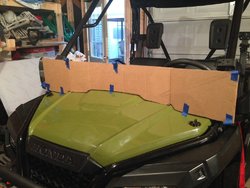
I started making my windshield, after about 5 cardboard templates I finally cut some polycarbonate.
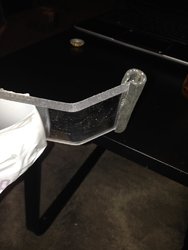
I did a test bend in a scrap piece by heating it up and slowly bending it.
I'm going to attempt to try using a brake press and see how that works.

I'm making it out of 1/4" polycarbonate, going to use Honda rops clamps to mount it.

The idea is to make a 2 piece windshield, this part is the wind deflector half, with a top half that's removable.

The total cost should be about $40 for me for the whole setup.
IMG 0206 IMG 0226 IMG 0227 IMG 0228
 
J

Jshell3

Guest
I started making my windshield, after about 5 cardboard templates I finally cut some polycarbonate.
I did a test bend in a scrap piece by heating it up and slowly bending it.
I'm going to attempt to try using a brake press and see how that works.

I'm making it out of 1/4" polycarbonate, going to use Honda rops clamps to mount it.

The idea is to make a 2 piece windshield, this part is the wind deflector half, with a top half that's removable.

The total cost should be about $40 for me for the whole setup.
View attachment 44493 View attachment 44494 View attachment 44495 View attachment 44496
Dang. Very nice!

I love to see ppl pull something like this off. Lots of bends and angles!!!

Looks good!
 
  • Like
Reactions: trigger
H

Heloron

Well-Known Member
Mar 5, 2017
116
290
63
Oroville, California
Ownership

  1. 500
I started making my windshield, after about 5 cardboard templates I finally cut some polycarbonate.
I did a test bend in a scrap piece by heating it up and slowly bending it.
I'm going to attempt to try using a brake press and see how that works.

I'm making it out of 1/4" polycarbonate, going to use Honda rops clamps to mount it.

The idea is to make a 2 piece windshield, this part is the wind deflector half, with a top half that's removable.

The total cost should be about $40 for me for the whole setup.
View attachment 44493 View attachment 44494 View attachment 44495 View attachment 44496
Lexan reacts just fine to a cold bend, 1/4 " will easily bend with no heat needed. Working on a windshield myself with the top half folding up and laying on the roof top. I'll see if it works out.
 
J

JTW

Guest
Lexan reacts just fine to a cold bend, 1/4 " will easily bend with no heat needed. Working on a windshield myself with the top half folding up and laying on the roof top. I'll see if it works out.
Reeeeally??? I want to see a video!
 
J

Jshell3

Guest
Reeeeally??? I want to see a video!
My 1/2 windshield on Blueberry P500 was Lexan.
I watched a demonstration where the guy put it in a vice and hit it w a sledgehammer over and over.
Bending it.
I was impressed.
I knew it wouldn't crack from being tightened down, anyways.
 
  • Like
Reactions: trigger and JTW
Travissf

Travissf

Active Member
Apr 8, 2017
52
133
33
Minnesota
Ownership

  1. 500
I got to get it a little dirty over memorial weekend, video to come once I figure it out.
Last bit I did for the break-in miles haha

IMG 0247 IMG 0248
 
Travissf

Travissf

Active Member
Apr 8, 2017
52
133
33
Minnesota
Ownership

  1. 500
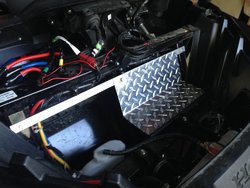
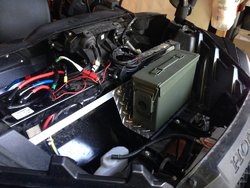
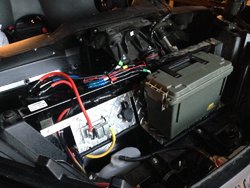
I started working on a storage spot under the hood and I'm going to make a wiring mount near the winch solenoid, so I can put the winch remote plug onto that.
Wiring will be on the left and storage will be on the right, I'll put a plastic ammo can instead of the metal one in the picture.
I'm just using some random junk that I have laying around my garage so it's a free project lol.

IMG 0431 IMG 0432
 
  • Like
Reactions: trigger
advertisement
Travissf

Travissf

Active Member
Apr 8, 2017
52
133
33
Minnesota
Ownership

  1. 500
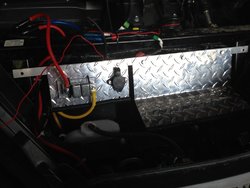
I made a bit of progress on the electrical mount part of this today, just gotta clean up the wiring and mount the ammo can now.

IMG 0446
 
  • Like
Reactions: trigger
Travissf

Travissf

Active Member
Apr 8, 2017
52
133
33
Minnesota
Ownership

  1. 500
I got the under hood storage and cleaned up the wiring now.
The ammo can is bolted down and has rubber washers to keep water out, and I used wing nuts to make it easily removeable.

IMG 0456