P500 ripped o-ring?

E

eric615

New Member
Jul 13, 2018
4
1
3
ILLINOIS
Ownership

  1. 500
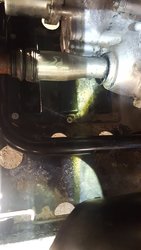
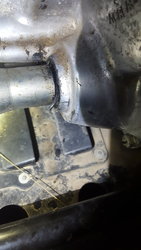
I was adjusting my clutch today on my p500 and underneath I saw what looked to be a ripped o-ring where the front out put shaft goes into the transmission (not sure on the terminology). What would this part be called and what would be the best approach to fixing it. Not sure how serious it is and if I should get it fixed before riding anymore. Any help would be greatly appreciated. Thanks!

20180713 190323 20180713 204405
 
DG Rider

DG Rider

Member: Triple Clutch Club
Lifetime Member
Aug 14, 2013
9,450
43,070
113
Casa Grande, AZ
Ownership

  1. 700-2
There is a O ring on the shaft (and usually one on the outsides if the boot) to keep grime from getting in the joint. You'll have to pull the shaft, but that usually means the diff has to be slid forward.
 
  • Like
Reactions: trigger
E

eric615

New Member
Jul 13, 2018
4
1
3
ILLINOIS
Ownership

  1. 500
Thank you for the quick response! hopefully that isn't too big of a project!
 
  • Like
Reactions: trigger
Hondasxs

Hondasxs

Club Founder
Staff member
Lifetime Member
Supporting Member
Feb 13, 2013
18,452
66,871
113
Charlotte, NC
HondaSxS.com
Ownership

  1. 1000-5

  2. Talon R
DG Rider

DG Rider

Member: Triple Clutch Club
Lifetime Member
Aug 14, 2013
9,450
43,070
113
Casa Grande, AZ
Ownership

  1. 700-2
Is it O ring #20 you're talking about @DG Rider ?

View attachment 80984
Yeah...19 or 20. Thing is, those are "captured" under the collar, so it would be hard to have it get ripped out. My other thinking was that 16 or 18 had walked off the boot, but it looks like they are in place in the pics.
 
Smitty335

Smitty335

Well-Known Member
Lifetime Member
Supporting Member
Oct 3, 2016
35,445
208,726
113
NWA Arkansas
Ownership

  1. 1000-3

  2. 1000-5
I was adjusting my clutch today on my p500 and underneath I saw what looked to be a ripped o-ring where the front out put shaft goes into the transmission (not sure on the terminology). What would this part be called and what would be the best approach to fixing it. Not sure how serious it is and if I should get it fixed before riding anymore. Any help would be greatly appreciated. Thanks!

View attachment 80977 View attachment 80978
Welcome! This is the only forum that I know that has wireless mechanics,HA!
 
E

eric615

New Member
Jul 13, 2018
4
1
3
ILLINOIS
Ownership

  1. 500
Thanks so much for your input and advice! You guys are a great resource. Appreciate it. Hopefully I can do this myself and save some money.
 
Mudder

Mudder

NTC Ambassador of Walls
Lifetime Member
Oct 1, 2016
11,657
88,035
113
Georgia
Ownership

  1. Other Brand

  2. 500
@eric615 , First, welcome on joining the forum. If you decide to go the route to pull the front differential forward, it might be a good time to add the front locker if interested. Regardless, since you just joined yesterday, the video links for the locker install may help understand the work involved for pulling the axle by unbolting the front differential. This list is just a personal draft of lessons learned from installing the locker last week. See item 13 as my O ring was disengaged when putting things back together, almost missed it. Good Luck.

P500 Torq-Master Locker Install Tips.
  1. Link to JWB Video. https://hondasxs.com/attachments/tl-honda-final-6-28-18-pdf.79804/
  2. Link to AMR (Jay_man81) video P500 - Torq-Masters torq locker feedback
  3. Read supplied instructions front to back before starting, will clarify videos (shims vs cone washer reuse, etc). A link to a .pdf of instructions would be helpful.
  4. Bumper and winch may come off as a unit, depending on type.
  5. Take measurement of exposed threads on 4wd cable to help in reinstall.
  6. Caution: Pull 4wd sensor plug instead of removing bolt and twisting wire.
  7. Free up brake line, just 2 bolts each side. Calipers remained in place.
  8. Do not have to remove steering joint, just A arm bolts, ample clearance to pull axle out.
  9. Recommend Zip tie or other method to support loose axles to A arm to prevent stress after removal from differential.
  10. Before starting to remove cross pin, get proper sized drill bit and pin punch to remove pin (someone give proper size) and a point punch to re-dimple pin in place.
  11. Pre lube locker surfaces during installation.
  12. Circlip update from Torq-Master. Axle Re-installation - Remove the circlip from the differential side of the axle shaft assembly. Then tighten the circlip using pliers, reducing the diameter of the circlip. Reinstall circlip onto the axle shaft ensuring that the circlip is tight in the circlip recess in the axle shaft.
  13. Caution: when sliding the rear of the front drive shaft into the engine output housing, check O ring. Also the rubber boot has tabs to pull over the coupling. Do this last when you can spin the axle during rotation test, pull boot over in sections as you rotate shaft.
  14. Refill with 75-140w gear oil (optional heavier weight).
  15. Clean dripped oils, then reinspect after riding to ensure no leaks at differential.
  16. Give a Thanks to Torq Masters on their FB page, website or Honda SxS forum here: Welcome TORQ Masters to the Honda SxS Club!
 
Last edited:
  • Like
Reactions: jinx
advertisement
DG Rider

DG Rider

Member: Triple Clutch Club
Lifetime Member
Aug 14, 2013
9,450
43,070
113
Casa Grande, AZ
Ownership

  1. 700-2
Honestly, you can probably just remove the diff bolts and slide the whole thing forward enough to get the driveshaft out. I KNOW the 700 can do this, and I'd at least try it on the 500.
I'd also grease the little collars. Mine had surprisingly little grease in them.
 
Mudder

Mudder

NTC Ambassador of Walls
Lifetime Member
Oct 1, 2016
11,657
88,035
113
Georgia
Ownership

  1. Other Brand

  2. 500
@eric615 Definitely would try @DG Rider suggestion first, only a few inches to clear as I remember. But that new locker sure is sweet. LOL. Second the grease comment.
 
Last edited:
  • Like
Reactions: JWB and eric615
JWB

JWB

Well-Known Member
Lifetime Member
Oct 3, 2016
802
2,023
93
California MD
Ownership

  1. 500
@eric615 , First, welcome on joining the forum. If you decide to go the route to pull the front differential forward, it might be a good time to add the front locker if interested. Regardless, since you just joined yesterday, the video links for the locker install may help understand the work involved for pulling the axle by removing the front differential. This list is just a personal draft of lessons learned from installing the locker last week. See item 13 as my O ring was disengaged when putting things back together, almost missed it. Good Luck.

P500 Torq-Master Locker Install Tips.
  1. Link to JWB Video. https://hondasxs.com/attachments/tl-honda-final-6-28-18-pdf.79804/
  2. Link to AMR (Jay_man81) video P500 - Torq-Masters torq locker feedback
  3. Read supplied instructions front to back before starting, will clarify videos (shims vs cone washer reuse, etc). A link to a .pdf of instructions would be helpful.
  4. Bumper and winch may come off as a unit, depending on type.
  5. Take measurement of exposed threads on 4wd cable to help in reinstall.
  6. Caution: Pull 4wd sensor plug instead of removing bolt and twisting wire.
  7. Free up brake line, just 2 bolts each side. Calipers remained in place.
  8. Do not have to remove steering joint, just A arm bolts, ample clearance to pull axle out.
  9. Recommend Zip tie or other method to support loose axles to A arm to prevent stress after removal from differential.
  10. Before starting to remove cross pin, get proper sized drill bit and pin punch to remove pin (someone give proper size) and a point punch to re-dimple pin in place.
  11. Pre lube locker surfaces during installation.
  12. Circlip update from Torq-Master. Axle Re-installation - Remove the circlip from the differential side of the axle shaft assembly. Then tighten the circlip using pliers, reducing the diameter of the circlip. Reinstall circlip onto the axle shaft ensuring that the circlip is tight in the circlip recess in the axle shaft.
  13. Caution: when reinstalling fromt drive shaft into engine coupling housing, check O ring. Also the rubber boot has tabs to pull over the coupling. Do this last when you can spin the axle during rotation test, pull boot over in sections as you rotate shaft.
  14. Refill with 75-140w gear oil (optional heavier weight).
  15. Clean dripped oils, then reinspect after riding to ensure no leaks at differential.
  16. Give a Thanks to Torq Masters on their FB page, website or Honda SxS forum here: Welcome TORQ Masters to the Honda SxS Club!
I need to clear something up here. The drive shaft does NOT have to be disassembled in any way. It just slides off the spline at the engine, and slides right back on. It may stick a little, but in most cases it'll still slide off. If you look at the pic on page 7 of the locker install manual, you can see the joint is completely intact.
 
  • Like
Reactions: DG Rider
JWB

JWB

Well-Known Member
Lifetime Member
Oct 3, 2016
802
2,023
93
California MD
Ownership

  1. 500
Honestly, you can probably just remove the diff bolts and slide the whole thing forward enough to get the driveshaft out. I KNOW the 700 can do this, and I'd at least try it on the 500.
I'd also grease the little collars. Mine had surprisingly little grease in them.
Agree!:)
 
JWB

JWB

Well-Known Member
Lifetime Member
Oct 3, 2016
802
2,023
93
California MD
Ownership

  1. 500
Is it O ring #20 you're talking about @DG Rider ?

View attachment 80984
#19 is the o-ring in @eric615's picture. There is a groove inside the coupler where that sits. Probably got damaged during assembly at the factory, and has finally worked it's way out. Here's the part # 91311-MB0-003
EDIT: Verify that it is not the one on the engine side- I can't find it on the parts pages, assuming it would show some kind of seal on the front crankcase side.
 
Last edited:
  • Like
Reactions: eric615
lee

lee

Village Idiot
Lifetime Member
Club Contributor
Apr 4, 2013
2,387
13,521
113
Springfield Ohio
Ownership

  1. 500
Front of the crank case has a seal pressed in to the case.
The output shaft rotates in the seal.
O-ring is to seal the coupler to the output shaft.
The coupler and shaft rotate together (hopfuly) so just an O-ring is used to seal between them.

Inside the coupler is a crown spline, it allows a little bit of misalignment in the drive line with out binding.
The crown spline will be happier with a little bit of grease and no dirt.
 
  • Like
Reactions: eric615 and JWB
JWB

JWB

Well-Known Member
Lifetime Member
Oct 3, 2016
802
2,023
93
California MD
Ownership

  1. 500
I've had a very small leak at the rear crankcase seal since I got the machine. Honda won't do anything about a seal that 'weeps', and honestly it isn't that big of a deal to me- it'll leak/use, about 1/4 quart between oil changes. I'm not looking forward to changing that one...although that would be the excuse... I mean the time to do that big bore kit:)
 
  • Like
Reactions: eric615
T

Tward

New Member
Oct 16, 2016
2
2
3
Mississippi
Ownership

  1. 1000-3
Honestly, you can probably just remove the diff bolts and slide the whole thing forward enough to get the driveshaft out. I KNOW the 700 can do this, and I'd at least try it on the 500.
I'd also grease the little collars. Mine had surprisingly little grease in them.
 
advertisement

About us

  • Our community has been around for many years and pride ourselves on offering unbiased, critical discussion among people of all different backgrounds. We are working every day to make sure our community is one of the best.

User Menu

Buy us a beer!

  • Lots of time and money has gone into making sure the community is running the best software, best designs, and all the other bells and whistles. Care to buy us a beer? We'd really appreciate it!

    Beer Fund!

    Club Membership!