P1000 Bear's shop projects - A tinkerers guide to tinkering.

BearWoods

BearWoods

Well-Known Member
Dec 14, 2018
92
260
53
East Stroudsburg, PA
Ownership

  1. 1000-3
Alright, so I am a certified tinkerer. I have an affinity for taking on projects, and communicating with others that share this gift / curse of not being able to stop building things. (Skip down to the photos if you are like me and look at just the photos in magazines with no intention of reading the articles.)

Since life blessed me with the gift of ideas, gab, and my home workshop.. I created this thread to share such ideas with like minded people who might enjoy any of the projects that come up.

I purchased my 2016 P1KEPS in 2018 used. The previous owner had modified it with led lights, stereo, fox shocks, a winch, windscreen, and big mud tires on 14" wheels. I added a KFI composite plow, a rear window, and I just swapped over to Kumho M/T truck tires. The next project I'm working on is going to be a fiberglass bed cover in it's final version.

Since I'm naturally inclined to build things out of wood, the first version is going to consist of a wooden frame and shell, covered in a hard medium and coated in epoxy paint. Ideally if I take this design into production at some point in the future the shell would consist of just fiberglass, and or an aluminum shell for weight savings.

The features I considered as I'm building this are as follow:

- Must be tall enough to fit camping gear, fuel cans, chain saw cases, small propane tanks, and 5 gallon buckets with room to spare.
- Must have useful side pockets inside to hold surplus ammo cans for medical supplies, and other small goods.
- Must fit snugly onto the bed rails to allow a seal.
- Must fit with the Honda genuine accessory rear window without touching it, or blocking the rear window view.
- Must be able to attach securely to the existing plastic bed without more than 4 mounting points.
- Must tilt with the dump bed feature, without contacting anything, or having to remove the shell.
- Must look aesthetically similar to the style lines already on the exterior of the Pioneer.
- Must be as water tight as possible without re-designing the tailgate which of course will always allow water in.
- Must not have any hardware on the sides that can be caught or damaged by branches.
- Must have a means of locking rear door, to provide secure storage when away from the vehicle.
- Must have a rear door that folds completely up and out of the way so that taller users do not need to duck down to utilize the bed when the door is opened to gain access to rear cargo.
- Must fasten to the bed with no more than 4 minimally in

So far, I've completed a wooden frame, and covered it in 1/8 plywood and countersunk all the hardware then back-filled all the screw heads for a flush exterior finish. Next will be the rear door and hinge with locking hardware. This is actually a bigger challenge than it seems, though I've got an idea in the works I will be trying to build the door this week and updating new photos as I go along.


Glad to be part of this great forum, hope at the very least I might inspire some of you other tinkerers to get out in the garage and build something!

DSC05862
DSC05863
DSC05864
DSC05866
DSC05867
DSC05869
DSC05868
DSC05871
DSC05874
DSC05878
DSC05882
DSC05886
DSC05887
DSC05892
DSC05893
DSC05895
DSC05899
DSC05901
Pioneer tires1


This is where I'm at as of 1/7/19.

I hope to have completed the rear hatch, and perhaps the inside storage ideas this week. Exterior finish is weather permitting. I need to sand outside, as I made a mess of the entire shop trying to sand indoors to stay warm as you can see in the photos.
 
BearWoods

BearWoods

Well-Known Member
Dec 14, 2018
92
260
53
East Stroudsburg, PA
Ownership

  1. 1000-3
Very cool! Didn't need framing that heavy though, not carrying any weight other than itself and the plywood creates the structural diaphragm. Consider 2 x 2 if you put it into production, lighter and creates more room. I'm diggin' the concept though. :)

I agree the frame is too heavy, but my wood supplier dropped off a truck load of 2x4's. I get most of my wood second hand that people are throwing out so I just end up working with what ever is free.

I did consider bolting a spare tire mount to the top of this, though I'm undecided yet because of lack of rearward visibility.
 
ofrcboy

ofrcboy

Well-Known Member
Lifetime Member
Nov 27, 2015
507
589
93
Oregon
Ownership

  1. 1000-5
Man that is HD, if it is removable it could be used for a dance floor. Good idea just overbuilt.
 
  • Like
Reactions: Bastardchild
BearWoods

BearWoods

Well-Known Member
Dec 14, 2018
92
260
53
East Stroudsburg, PA
Ownership

  1. 1000-3
Man that is HD, if it is removable it could be used for a dance floor. Good idea just overbuilt.

:D man i laughed hard at this comment, hahaha that's great!

Total cost when done will be about $60 for the whole prototype to be completed. All the money is going to be in the paint, and the 1/8 plywood sheets. The rest is all free from the work I do on the side people supply me with a lot of free hardware and lumber.

This project actually started as an idea for a camper top I got from that thread where somebody photoshoped a camper top on a Pioneer 1K. That is mainly why I began with the 2x4's for supporting a full size camper top.

I decided not to go full height when I realized there's no good way to put a roof over the project unless I bought a roof for a P1K5 and put it over the P1K3 for one solid panel which would eliminate the functionality of the dumping bed which is required for maintenance. The next best option was to build a topper that would raise and lower with the bed - and this idea was born. Albeit, extremely heavy.
 
trigger

trigger

Old Ironsides
Vendor
Lifetime Member
Supporting Member
Feb 13, 2016
23,856
178,231
113
Bay City, Michigan
www.quickshieldutv.com
Ownership

  1. 500
A load of 2x4's makes a double load of 2x2's. You've got a tablesaw in that workshop don't you? If that plywood isn't glued on you could take it apart and get to rippin' before you put the fiberglass on...might as well build a second one with the cut offs. :D
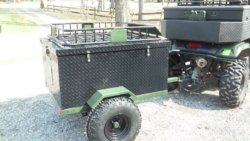
Just bustin' your balls Bear! Here's something along the same lines as what you're doing. 2x2's wrapped with ply and aluminum.

Toad Inside Toad Latches
 
BearWoods

BearWoods

Well-Known Member
Dec 14, 2018
92
260
53
East Stroudsburg, PA
Ownership

  1. 1000-3
Really neat project! The rack on top of the box is exactly what I was trying to visualize, thanks for sharing! Nice work on that by the way I dig the black diamond plate finish!

lol @ building 2 with the scraps, yes have table saw. Did glue already though.

I will cover this one with "poor mans fiberglass" just to get a smooth finish for photo purposes. Since it's not perfectly symmetrical (I tend to cut things by eye, and not by measure) it'll be used to make a drawing of exact dimensions to produce a fiberglass mould.

DSC05880
 
Bastardchild

Bastardchild

Well-Known Member
Nov 3, 2016
1,978
7,251
113
Orange Heights, fl
Ownership

  1. 500

  2. 1000-5
Self proclaimed tinkerer here also. I typically work with metal though. I love this thread. I can tell you have an eye for detail. If you could use that wood box as a buck to make several fiberglass copies off of I bet they would sell like hotcakes. Damn nice work!
 
advertisement
BearWoods

BearWoods

Well-Known Member
Dec 14, 2018
92
260
53
East Stroudsburg, PA
Ownership

  1. 1000-3
Self proclaimed tinkerer here also. I typically work with metal though. I love this thread. I can tell you have an eye for detail. If you could use that wood box as a buck to make several fiberglass copies off of I bet they would sell like hotcakes. Damn nice work!


Thank you very much for that, I hope I can make it interesting enough to drum up attention from somebody that will collaborate with me on making this into a production unit!
 
BearWoods

BearWoods

Well-Known Member
Dec 14, 2018
92
260
53
East Stroudsburg, PA
Ownership

  1. 1000-3
Cliff's notes: I started on the rear hatch, scroll down to see pics if you don't like to read.

After a very uneventful trading day, I shut the computer down and decided to put in some shop time. I scrounged up some some old furring strips I had stashed in the back of my wood storage shed. I also found a piece of an old aluminum piano hinge about 70 inches long which gave me an idea.

I know a lot of you will be disappointed that I didn't build the hatch out of 2x4's (lol) just kidding.

So I got out the trusty ol' titebond 3 and clamped some pieces together until I could pre-drill and countersink some trim screws.

My original idea for the hatch was to hinge it from the inside with expensive hardware that would have cost more than the rest of the project did.. and because of that I had to nix that idea and go with installing the piano hinge instead.

This came with plus's and minus's. The minus is there is an ugly hinge visible, which protrudes up past the top of the rest of the box. The silver lining is, the hinge when installed backwards allowed me to make the lid flip completely up out of the way.Because of the inverted install I fit some some 1/8 ply strips on the left and right hand side which is exactly the same gap I needed to fill from installing the hinge backwards like that.

It just so happens that the truck topper weather stripping I bought is also this exact same depth, so when installed it will make the entire rear door waterproof as I was hoping by applying the tape along the outsides and across the top of the hinge that is completely hidden by the door.

Here's some pics for reference:

DSC05917
DSC05923
DSC05927


Next is to order some utility truck box T handle, or paddle latches. Locking ones. To look the part, and to create a positive seal on the rear hatch, along with the ability to protect the contents of the bed.

To be continued... It will take a few days for those to arrive.
 
BearWoods

BearWoods

Well-Known Member
Dec 14, 2018
92
260
53
East Stroudsburg, PA
Ownership

  1. 1000-3
I grabbed a stock hitch mount from a 2016 Chevy Colorado that somebody was going to throw out. Ordered some telescoping square tubing for mounting. Bolted some 1/4" steel plates I found in my scrap steel cabinet to the 4 unused tapped holes in the rear of the chassis. I guess those threaded holes are for the 1000-5 ROPS? (You can see the steel plates that the larger square tubing will be welded to, in the pic with the bumper set up behind the pioneer.)
DSC05928
DSC05930
DSC05931
DSC05932
DSC05933
DSC05934


I wanted some protection for the muffler along with something I can bolt the factory tow hooks I removed from my 2011 Toyota Tundra to. I knew grabbing them off the truck before selling it was a good idea :p (Heavy duty tow hook points can be seen in the third photo down to the left of the bumper)

The hardest part about this is figuring out the angles to cut the square tubing to fit to the bumper by eye. I have no sophisticated way of doing this. Take a look at the photo of the angles I had to figure out by eye to get that tubing to fit the bumper to make it level. Not bad for a first timer eh?

This project may take me a couple weeks to complete also, but good things come to those who have patience.
 
BearWoods

BearWoods

Well-Known Member
Dec 14, 2018
92
260
53
East Stroudsburg, PA
Ownership

  1. 1000-3
Thank you for the gauge suggestion, I shall order one for next project that requires it for sure!

So I've been out in the garage for a few hours giving my flux core welder some exercise.

So, now that you know I'm using a flux core welder with a wonky feed mechanism that likes to go herky jerky you can excuse my welds. lol

I gave the rear bumper some more thought and after measuring 300 times I finally figured out how to get it all set up to weld it so that it would be straight, level, and removable. I designed it with consideration to do such things as skid logs. Also It's designed to be used as a step to access the top of the cargo box. I placed it so the tow hitch below is usable, and the tailgate still opens fully. To tilt the bed back, simply pull the pins (not installed yet, can't find a 5/8 drill bit in my shop) and remove the bumper.

I need to cut out some steel circles and weld up the ends, then to sand blast it all, and paint.

I finally remembered what the pieces of steel were that I used to make the bumper mounts that bolt to the chassis. They were leaf spring U bolt retainers from I don't know what. Either a truck, or my old MGB. Let no scrap go to waste :)

Pics:

DSC05935


DSC05936
DSC05937
DSC05938
DSC05945
DSC05946
DSC05948


Hope this inspires somebody to make use of all that junk they've been collecting over the years and turn it into something useful!
 
Bastardchild

Bastardchild

Well-Known Member
Nov 3, 2016
1,978
7,251
113
Orange Heights, fl
Ownership

  1. 500

  2. 1000-5
It looks like you're not too shabby at working with metal either. Even with my contour guage I probably would have screwed those contours up 17 times before I got it right. Lol
 
BearWoods

BearWoods

Well-Known Member
Dec 14, 2018
92
260
53
East Stroudsburg, PA
Ownership

  1. 1000-3
I kept grinding and grinding and holding the pieces together. When I got close I made fine adjustments, and to duplicate the square tube I scribed lines on it holding it against the other one (opposite sides.) I really didn't think I'd ever figure out how to do that lol!

I don't know if any tool would really help getting square tube to connect to a round tube, round to round would have worked out perfectly!
 
BearWoods

BearWoods

Well-Known Member
Dec 14, 2018
92
260
53
East Stroudsburg, PA
Ownership

  1. 1000-3
Made my days wages in the first 2 minutes of the day in the market.. left me with plenty of time to tinker!

So I made some end caps for that bumper and welded them up. Changed out the steering wheel for my Momo knockoff with NRG adapter... and couldn't resist but to stick on some vinyl off ebay it was just good cheap fun. I don't use this thing hard enough to warrant the one about not following me.. but it's still funny.

Pics of bumper work:

DSC05950
DSC05952
DSC05954


Then it was onto the steering wheel. I had to grind about 3/8 inch off the NRG adapter to give me enough room for the lock nut to go back on, but I'm going to remove it all the way down to the brass so the wheel is closer to the shift paddles.

DSC05960
DSC05961
DSC05962
DSC05964
DSC05963
DSC05970


Last but not least for a little fun the decals.

DSC05971
DSC05973


Not bad for a day that was 22 degrees out.. thank goodness for the wood stoves!
 
advertisement

About us

  • Our community has been around for many years and pride ourselves on offering unbiased, critical discussion among people of all different backgrounds. We are working every day to make sure our community is one of the best.

User Menu

Buy us a beer!

  • Lots of time and money has gone into making sure the community is running the best software, best designs, and all the other bells and whistles. Care to buy us a beer? We'd really appreciate it!

    Beer Fund!

    Club Membership!